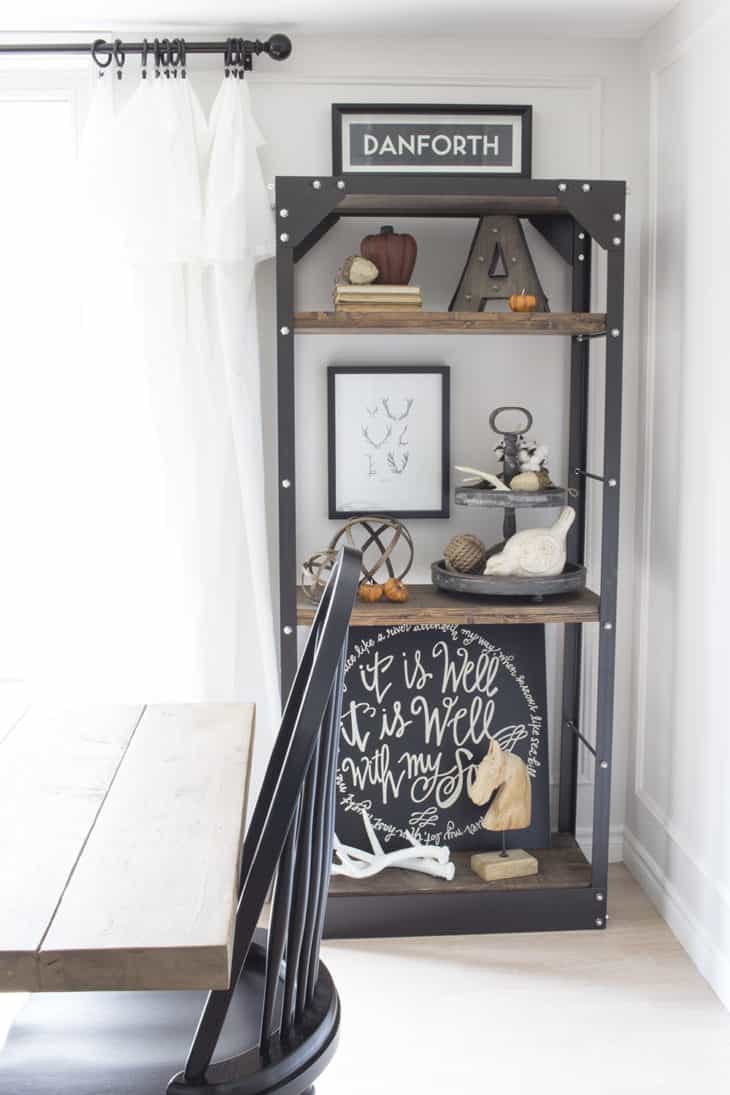
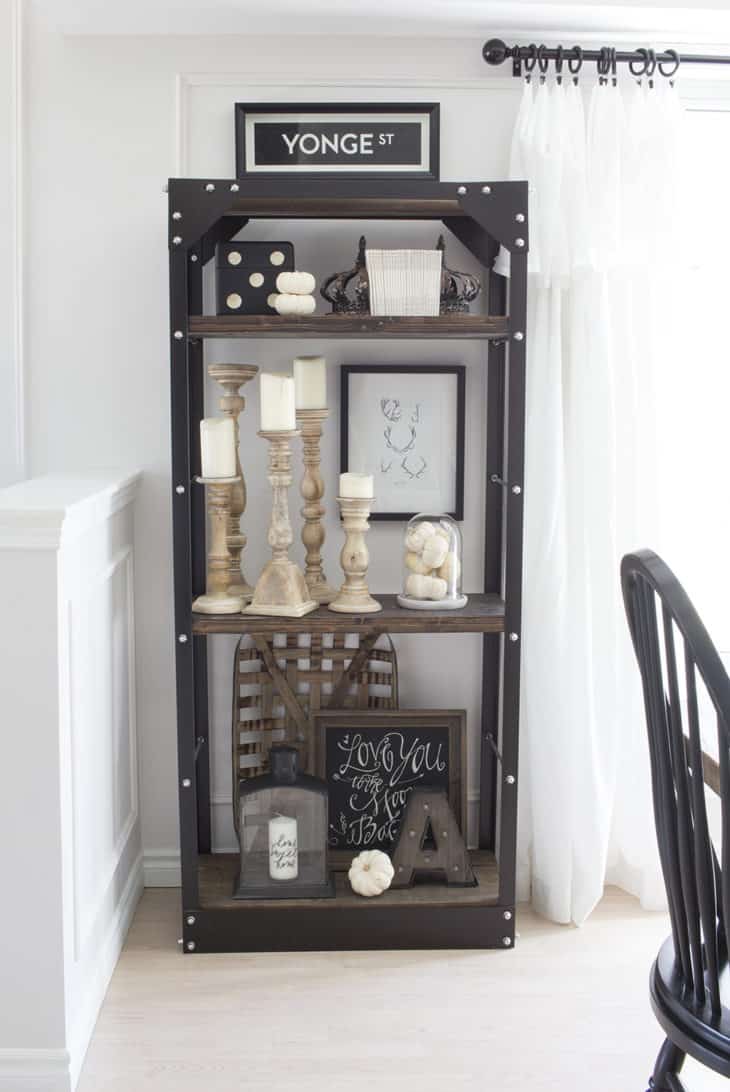
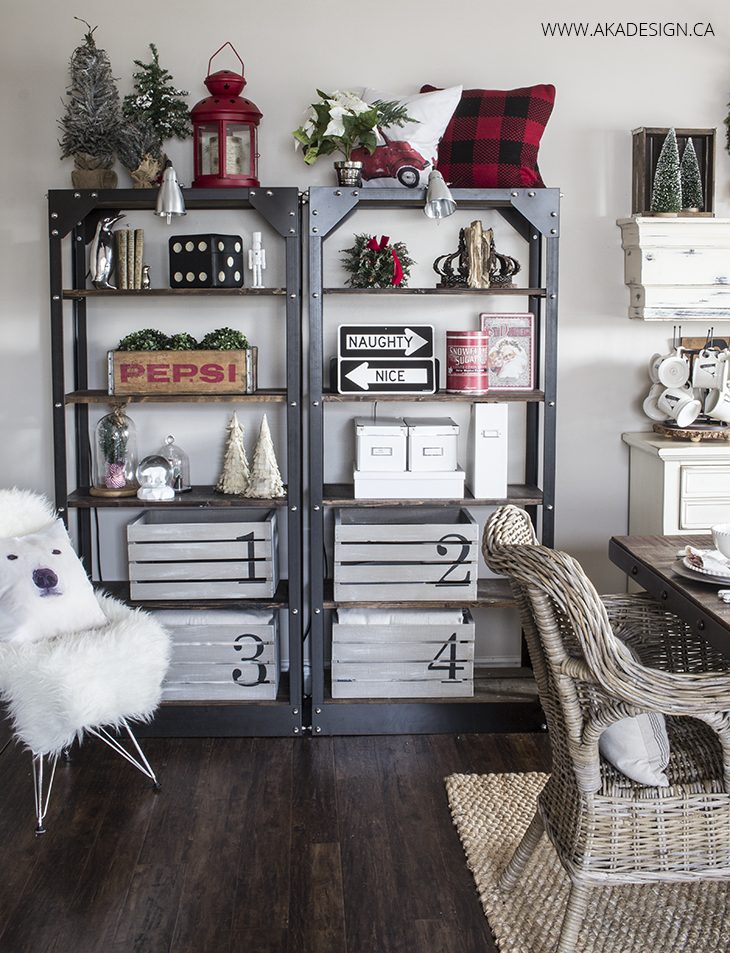
These industrial shelves—what I lovingly call my Restoration Hardware Inspired Shelves—have been one of the most requested tutorials I’ve ever shared! They’re incredibly versatile and have been a part of every home we’ve lived in, from our living room to the kitchen and even my office. Honestly, they’ve been a workhorse when it comes to storage and style.

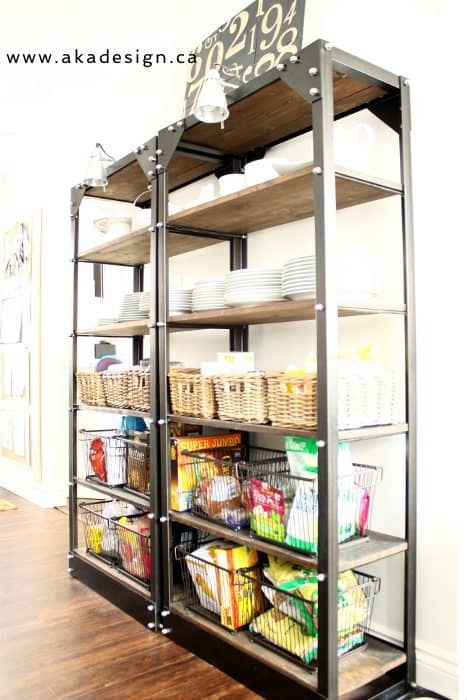
When we first made these shelves, we used reclaimed pallet wood and metal because, well, it was free! Later, we switched to thinner new pine boards for more stability, especially when we used them in the kitchen. Trust me, the switch made them even better! If you’re diving into this project, you might also enjoy my post on How to Stain Wood for tips on achieving a beautiful, rich finish, or my How to Make New Wood Look Old if you want a really rustic finish.
Industrial Metal and Wood Shelves DIY Tutorial
What you’ll need for one shelf (double everything if you’re making two, like we did):
Materials
- Angle iron 1.5″ x 1.5″ x 1/8″ thick
- 4 pieces, 68″ long (uprights)
- 2 pieces, 29.5″ long (top front and back)
- 4 pieces, 13.25″ long (top and bottom sides)
- Flat bar 4″ x 1/8″ thick
- 2 pieces, 30″ long (bottom front and back)
- All thread rod 3/8″-16
- 10 pieces, 14.5″ long (shelf supports)
- Hex bolts 3/8″-16 x 3/4″ long – 24 pieces
- Stainless steel acorn nuts 3/8″-16 – 44 pieces
- Plated hex nuts 3/8″-16 – 20 pieces
- Cold rolled steel gussets 1/8″ x 6″ x 6″ – 4 pieces (sheared/mitered to fit)
- Pine board 1″ x 13″ x 29.5″ (topmost shelf)
- Reclaimed pallet wood (shelves) – Total: 13″ x 29.5″ each (3 pieces per shelf to total 13″ depth)
- WD-40 or similar degreaser
- 2-3 cans of oil-rubbed bronze spray paint
- Minwax dark walnut stain
- Lint-free rags
Tools
- Drill with 3/8″ bit
- Sandpaper
- Lint-free rag
TIP: For clarification on some steps, please refer to detail photos and drawing. If you click on the drawing (isn’t Dean AWESOME?!), it will open larger in a new window. Right-click to save so you can refer back to it later.

1. Measure and drill holes in the metal
Precise measurements here are key, so take your time.
2. Sand burrs and sharp edges
This will ensure no one gets injured and give your metal a professional finish.
3. Clean all parts
Use WD-40 or a similar degreaser, and wipe everything down thoroughly.
4. Paint metal parts
Spray all metal pieces, including the all-thread rods, using light, even coats. Leave the nuts and bolts unpainted.
5. Prepare wood shelves
Cut, sand, and stain the wood pieces with Minwax dark walnut stain for a beautiful, rich tone.
6. Assemble shelves
Begin by building the front and back portions separately. Then join them together with the side pieces, ensuring the top angle iron pieces are placed correctly.
7. Thread hex nuts
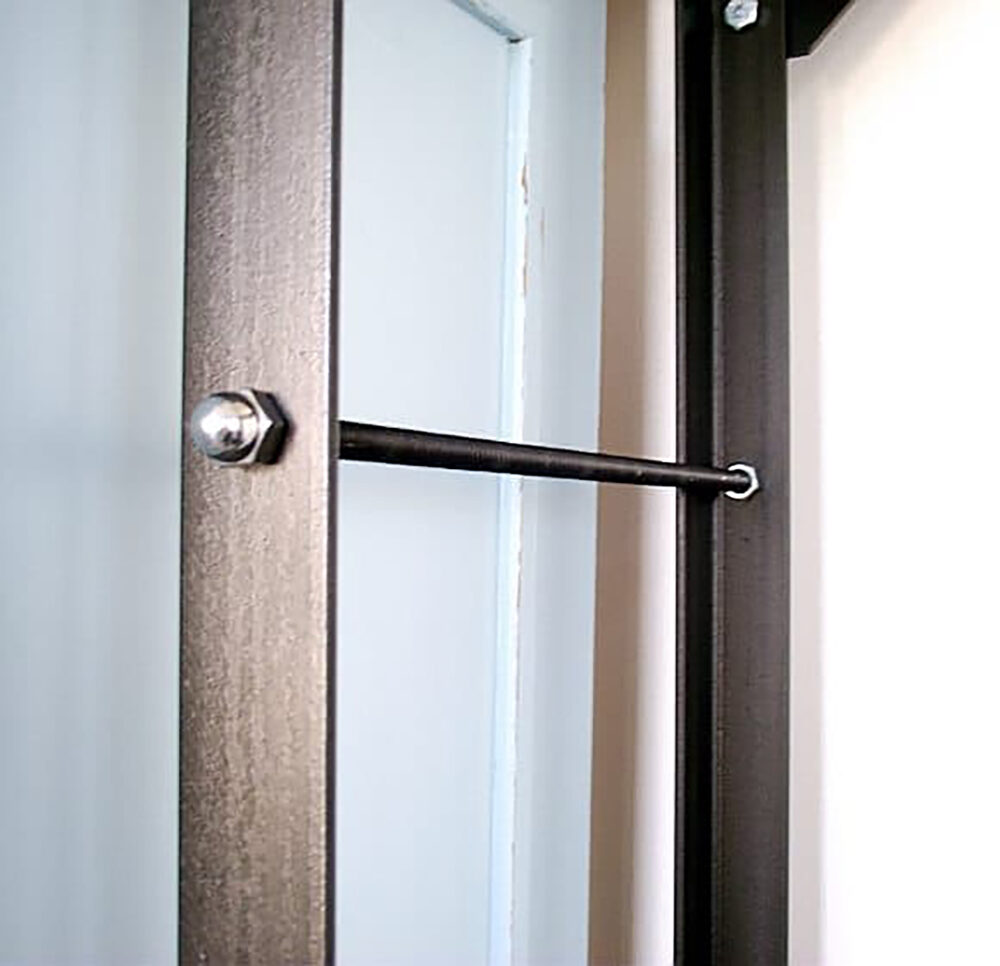
Add a hex nut to each end of every all-thread rod, 2 inches from the ends.
8. Secure all-thread rods
Attach these between the uprights using acorn nuts. Tighten the acorn nuts until they meet the angle iron, then secure with hex nuts on the inside.
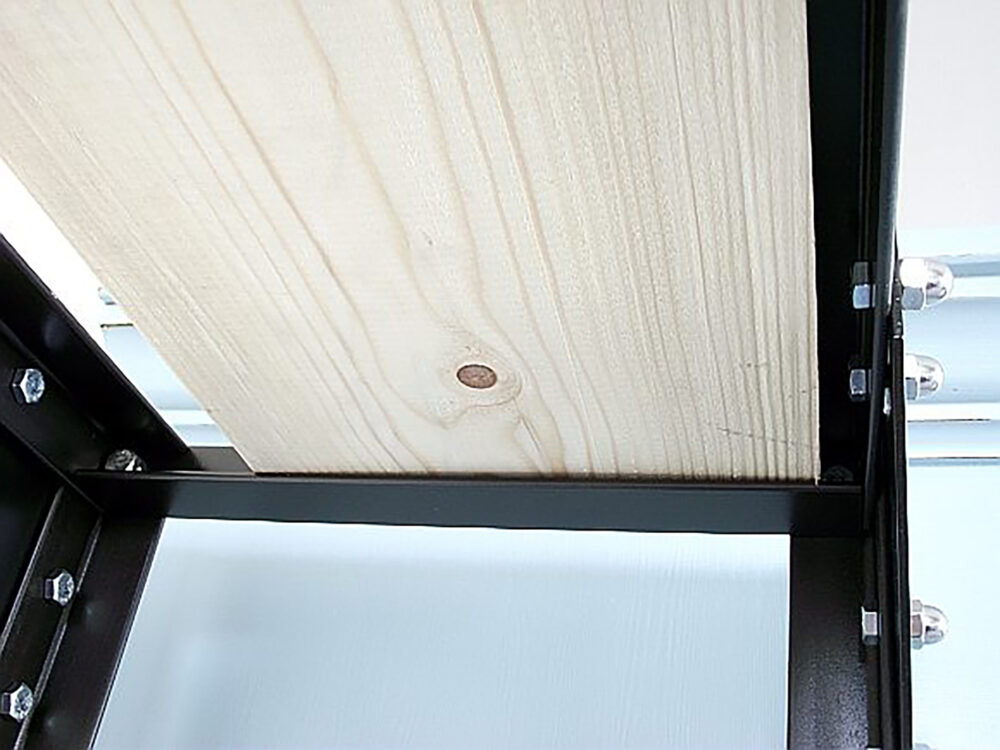
9. Install wood shelves
Set the wood pieces onto the all-thread rods.
10. Style and enjoy
Step back, admire your work, and style them to your heart’s content!


FAQs
Absolutely! You can use any wood you like, but I recommend pine or another lightweight option to avoid putting too much weight on the frame.
I’ve found Metal Supermarkets or similar stores to be a great resource. They can even cut the metal for you, which saves a ton of time.
Not at all! Choose a color that complements your decor. Black, matte finishes, or even metallics can look stunning.
Yes, but it does require some basic power tool skills and a little patience with measuring and assembly.
These shelves are sturdy and can handle a fair amount of weight, but I recommend sticking to decor and moderately heavy items to be safe.
More DIY Furniture
- DIY Industrial Wood and Metal Shelves
- DIY Brickmaker’s Coffee Table
- DIY Balustrade Coffee Table + Where to Get Balustrades!
- Ikea Hack: DIY Rustic Cube Shelves
- How to Make a Reclaimed Wood Headboard With New Wood For Less Than $50
- DIY Blanket Ladder Made with 2 x 4s
- DIY Faux Fireplace Mantel
- How to Build a Faux Mantel Shelf (DIY Mantel Shelf Tutorial)

DIY Industrial Wood and Metal Shelves
Build these industrial wood and metal shelves - they're so versatile and can be used in almost any room.
Materials
- Angle iron 1.5″ x 1.5″ x 1/8″ thick
- 4 pieces, 68″ long (uprights)
- 2 pieces, 29.5″ long (top front and back)
- 4 pieces, 13.25″ long (top and bottom sides)
- Flat bar 4″ x 1/8″ thick
- 2 pieces, 30″ long (bottom front and back)
- All thread rod 3/8″-16
- 10 pieces, 14.5″ long (shelf supports)
- Hex bolts 3/8″-16 x 3/4″ long – 24 pieces
- Stainless steel acorn nuts 3/8″-16 – 44 pieces
- Plated hex nuts 3/8″-16 – 20 pieces
- Cold rolled steel gussets 1/8″ x 6″ x 6″ – 4 pieces (sheared/mitered to fit)
- Pine board 1″ x 13″ x 29.5″ (topmost shelf)
- Reclaimed pallet wood (shelves) – Total: 13″ x 29.5″ each (3 pieces per shelf to total 13″ depth)
- WD-40 or similar degreaser
- 2-3 cans of oil-rubbed bronze spray paint
- Minwax dark walnut stain
- Lint-free rags
Tools
- Drill with 3/8″ bit
- Sandpaper
- Lint-free rag
Instructions

- Measure and drill holes in metal.
- Sand all burrs and sharp edges.
- Clean parts. Spray with WD-40 or similar degreaser and wipe clean.
- Paint all metal parts, including all thread rod. Do NOT paint nuts and bolts. As with all spray painting, paint a thin coat using a back and forth sweeping motion of your hand. Repeat until desired coverage is achieved. Let dry.
- Meanwhile cut and sand wood shelving pieces. And stain with dark walnut stain and a lint free rag.
- Assemble front and back portion of shelves separately first. Then join together with top and bottom side pieces. Note placement of top angle iron pieces – it is different than the bottom pieces.
- Thread hex nuts onto each end of each piece of all thread rod, 2 inches from the ends.
- Attach all thread rod between front and back uprights using acorn nuts. Tighten acorn nuts until they touch the angle iron. Then tighten the hex nuts to the angle on the inside.
- Put wood shelves in place by setting on all thread rods.
- Style and give yourself a pat on the back for a job well done!

Notes
For clarification on some steps, please refer to detail photos and drawing. If you click on the drawing (isn’t Dean AWESOME?!), it will open larger in a new window. Right-click to save so you can refer back to it later.
The metal can be sourced and likely cut for you at Metal Supermarkets or similar stores.
Every time I look at these industrial shelves, I’m reminded of why I love DIY so much. They’re functional, stylish, and truly one-of-a-kind. Whether you’re creating these for your kitchen, living room, or office, they’ll make a statement and serve you well for years to come. If you’ve been thinking about trying a project like this, go for it—you’ve got this!

amazing! you guys are so talented.
And you, my dear, are too sweet!
What lovely shelves, they are gorgeous
Thank you!
I like yours even better than the RH ones actually–that ladder is just an invitation for trouble in a house with littles! And it kinda blocks things off… Great tutorial!
I would love the ladder just for looks…but it would be oh so tempting for the kids and would totally block off the books, etc!
They DO look fabulous!!
🙂
Wow, beautiful work & what a great knockoff! I like your hardware detail better than the original RH version!
Thank you! I love our hardware too! So industrial!
HOLY BOLTS! You guys ROCK! I love love love your shelves and look how well planned and organized you are about the whole project too! I’m impressed! Thanks for sharing 🙂
Lol. Thanks Erin! And yes…be sure to find the most economical supplier near you for bolts if you decide to build the shelves!
Came over to have a peek @ your lovely little blog from Hodge Podge…what a great inspiration you are — I’ll be back for sure!
XoXo*S
Thank you Shawna…we’re happy to have you visit over here!!!
Now THAT is a project I could do couples DIY on (smile). Or…I could learn to use some power tools…just saying.
Awesomeness all around.
🙂 I don’t use power tools…too scary! But perhaps that’s cuz I’m a little clumsy! Ha! Love my Dean for his skills in that department!
Very Happy to find your link & browse your web pages filled with ideas on this cold damp rainy January day 🙂
🙂 so glad to help!
saw you featured at HOH
wow! super shelves! My daughter was asking me the other day if I could do this, and I told her I didn’t think so without welding. yippee!
I’ve sent her the link to your post.
thanks!
gail
I didn’t even know we were on HOH! These shelves aren’t the sunless DIY but there is definitely no welding!!! Good luck! Let us know how yours turn out.
I’ll say not bad. I’ll even say not too shabby. I’ll go so far as to say…umm..that’s freakin’ crazy-awesome…
You are hilarious!!! Thank you, we kinda like them!
What do I think? I think you are brilliant for coming up with such a great DIY knock off. I love it!
*Blushing* Thanks!
Oh my goodness! You are so clever! I love these…we are working on a solution for our basement right now….
Exciting…:)
This is AMAZING. I absolutely LOVE them!!!
🙂
shaunna
Thank you, friend!
xo
genius!
🙂 S.
WOW WOW WOWW!!! I am in LOVE with these shelves! I had been planning and scheming about how to make some that I saw on Ana-white.com but they were built using plumbing flanges and were gonna be super expensive to make! I love your version even better and they look sturdier and less tippy! Is that 150 dollar price for BOTH shelves or just one? I have an amazing source for salvage metal parts…I might try and find some of the stuff I need there first before heading to the store!! Totally making these SOON! 🙂 GREAT JOB!
Ooh salvaged metal parts…I like the sound of that! It would be $150 for one…not everyone needs two, so we just compared pricing for one. Sorry about the delay in my reply…your comment sort of got buried! Let us know how your shelves turn out!!!
Just came over from Knock Off Decor and I am SO happy I found your blog! This tutorial is fantastic and I can’t wait for my hubby and I to tackle it ourselves. I just started following your blog so I can’t wait to see more posts from you!
Hi Amy! We’re so glad you’re here!!! Good luck with your shelves!
Beautiful job! I am going to show these plans to my son..he’s a welder, metalworker, and all-around great help to me. I have some salvaged pieces of corner metal, very strong, that I could adapt using your plans..so thanks! You’ve inspired me! 🙂
wow this is amazing, no, amazing doesnt even cut it! this is pure genius. thank you so much for sharing this with us =)
I was wondering how long did you leave the wood stain on?
Hi .. Can you please tell me the colour shade of the blue wall cabinet.
Looks awesome ..Thanks ..Great site
Hi Mitch. The tv cupboard/armoire is painted a nice robin’s egg blue – Behr paint colour matched to Beauti-Tone Quayside 601-4.
These are amazing. Thanks for posting such an incredible idea. They inspired me to put together my own version. I had a quick question on the diagram though. For the uprights, there should be two types of upright drilling correct. In the picture it indicates two ways of drilling, but the way the right and left are labeled it seems read like they should all be drilled the same. As I started sketching my own I got confused at that juncture.
Metalsupermarkets? You just blew my mind!
I never thought a DIY project could look as great as a restoration hardware piece!
I JUST finished making a bookshelf out of reclaimed palettes and a couple copper pipes for crossbars…and I find this…where where you guys earlier in my life? lol
I was just wondering what the total measurement’s are when it’s all finished? It so beautiful. I love metal furniture & I am a DIY addict. I have never worked with metal & I though I would have to learn to weld if I wanted to build my own metal furniture then I came upon this & whoa! My mind is blown. I absolutely love this shelving unit. Now that I know there’s metal strips & other usable metal out there, I’m going to alter your plans & build a shelving unit for my super tiny bathroom. I am so grateful you made this post because I was about to make one out of plumbing pipes but that’s not the specific look I was looking for, so thank you for sharing this with us. Hopefully I can find a store that sells these items. Lowes is really the only home improvement store around here & they don’t sell anything buy plumbing pipes. Do you know of any online stores you can buy these items? Amazon has a few of these items listed above.
Thank you again
I was just wondering where you buy the metal to make this unit? I am in love with these types of shelving, basically anything metal/industrial. But the price that goes along with it, not so much. I build furniture but I can NOT seem to find any metal to build with other than plumbing pipes. I’ve checked Lowes, Home Depot & some local construction supply stores but haven’t had any luck. Any tips?
Hi Jamie, as mentioned somewhere in the post (understandable that you missed it – we didn’t highlight the fact enough!), you can get angle iron from places like Metal Supermarkets. 🙂
Cool Idea! I love how inexpensive these are! If you ever need super-cool floating shelf hardware, we have soem sweet DIY kits over at http://www.silicatestudio.com they work great with any wood, but especially reclaimed lumber.
I really appreciate the shelves you have made. Your work is impeccable and inexpensive . We all love new interiors, but designing DIY concepts are not very easy to implement for regular people like us. I had a chance to visit one of my friend’s home recently. The whole idea of residential design is eye catching with a realistic budget. Now its a big question for me. A renovated and contemporary model home is my new dream to accomplish.
well done! great project!
It is something I think I can do. I need two shelves in my new family room and this would look amazing in there! I was searching Kijij for old shelves to fix up so this is going to work out probably much better! Great!!!!!!!! Love your site!.
Thank you, Louise! We have found these shelves to be very handy and have used them in two living rooms, our kitchen and now the dining room!
Luv all your DIY projects
Thank you!!!
I love this project. And I especially love how you decorated for different seasons
Thanks!
Hi! Was wondering if you had the gussets custom made or if you got them somewhere readymad? Also what are the final total dimensions of the piece? This is so cool and I can’t wait to make one for our kitchen! Thanks for sharing!