When I first started DIYing, I was overwhelmed by all the skills I needed to learn, but staining wood quickly became one of my favorites. It’s an easy way to make any wood project look polished and professional, and once you know how to do it, you’ll want to stain everything from tables to headboards to shelves.
If you’re diving into woodworking for the first time, I also recommend checking out my DIY Balustrade Coffee Table Tutorial for an inspiring project where staining played a starring role. It’s the perfect way to put your new skills to good use!
How to Stain Wood – Step-by-Step Tutorial with Photos
In order to show you how to stain wood, I’ve take two offcut pieces of pine 2x4s. I’m going to prep and stain both of them as I would any other wood project, with one exception: I’m going to use pre-stain wood conditioner on one piece, but not the other. This will allow you to see the difference the extra small step makes to your finished project. Let’s get started, shall we?
Materials
(list includes paid affiliate links)
- 80 grit sandpaper
- 120 grit sandpaper
- Tack cloth
- Pre-stain wood conditioner – local hardware store
- Stain – local hardware store
- Stir sticks
- 2 Foam brushes
- Lint free rags
Instructions
1. The first thing you want to do is prep your wood project for staining. Starting with a low number/coarse grit sandpaper, sand your wood back and forth, with the direction of the grain to avoid adding scratches. Then use a finer higher number/finer grit sandpaper and sand it again in the same manner.

2. When your wood is nice and smooth, wipe it down with a tack cloth. This will help remove all the debris leftover from sanding, and prevent your stain from getting gooped up.

3. Open your pre-stain wood conditioner and give it a good stir with a stir stick. Using a foam brush, apply pre-stain wood conditioner, in the direction of the wood grain. It will look like watered down glue, but it will dry transparent. Let sit for one to five minutes.


4. Wipe off any excess pre-stain wood conditioner with a clean, lint-free towel or rag.

Pre-stain wood conditioner is an optional step when you’re staining a project. But I highly recommend it because it helps to create a lovely smooth finish. Without it, your stain may appear blotchy or uneven when your project is finished.
5. Now open your wood stain of choice and give it a good stir with a stir stick.

You don’t want to shake the can to mix it up as bubbles will form that will transfer to your wood project. And once they pop they will leave weird markings in your stain.
6. Using a new foam brush, apply a liberal amount of wood stain to your project. If your project is made from wood with a pronounced grain, you may need to dab some stain into the deeper grain, grooves and knotholes, or even apply it against the grain to ensure good coverage.

7. Then let your stain sit for one to three minutes. The longer you leave it on the darker it will be.
If you leave the stain sit for too long, it will become tacky and hard to wipe off. Don’t leave it any longer than the longest recommended time on the stain packaging. If you want a darker look, try a second coat after the recommended drying time, or a darker stain.
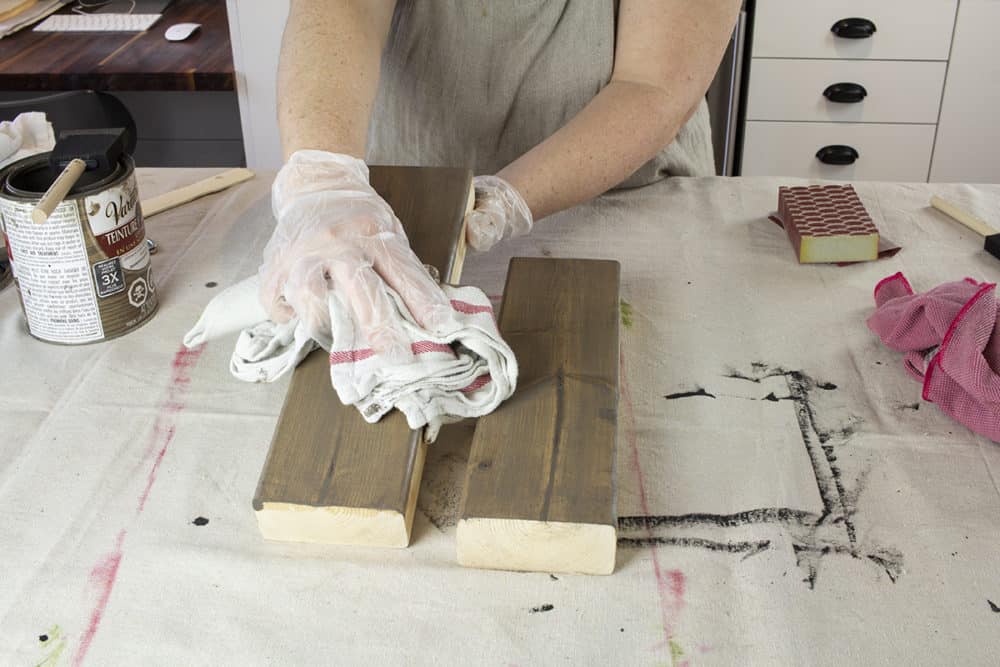
8. Wipe off the excess stain with a clean lint free cloth, going with the grain to avoid swirl or cloth marks in your finish. Let dry for one hour before applying a second coat or a finishing top coat like polycrylic or wax.

And that’s how you stain wood in just a few simple steps!
Make sure you lay your rags and brushes out flat to dry, especially if you used oil-based stain!
What Should You Use to Apply the Stain?
There are a few different options for what you can use to apply your stain.
If you’re using a water based stain, you can use a bristle brush that’s meant for acrylic or latex paint. You can also use a clean, lint free rag, a foam brush or a specialty stain “spreader”.
You can use all of the same things for applying oil-based stain, with the exception that if you choose to use a brush, you need to use one meant for oil-based finishes.
If the wood you’re using for your project has a large grain, or very open “pores”, you will want to use an applicator that can take the abuse of pressing hard to get the stain into the grain.
Should You Use Water or Oil-Based Stain for Your Project?
It can be tough to decide which type of stain to use, oil or water-based. Below are the advantages of using each one and what I prefer.
The advantages of using water-based stain:
- they are much less smelly and are therefore safer to use in smaller spaces or indoors if necessary
- they’re non-flammable
- they dry much quicker than oil-based stains
- the rags and brushes you use with water-based stain aren’t likely to spontaneously combust, even if you don’t lay the rags flat to dry
The advantages of using oil-based stain:
- the coverage is much nicer
- dry time is longer, so you don’t have to work quite as fast and the finish is more even
- less long-term maintenance
I prefer to use oil-based stains for my projects because I find water-based stains tend to look like watered-down paint because their color is so pigmented, which is generally not the look I’m going for!
How to Stain Wood Step-by-Step Video Tutorial
If you’re a visual learner, I’ve got great news for you! I’ve put together a how to video for staining wood. It’s pretty short and sweet – and is perfect if you’re a visual or auditory learner.
FAQs About Staining Wood
Water-based stains dry quickly, are less smelly, and safer for indoor use, but oil-based stains provide richer coverage and longer-lasting durability. I typically prefer oil-based stains for their beautiful, even finish.
While it’s optional, I highly recommend it. Pre-stain wood conditioner prevents blotches and ensures a smooth, professional-looking finish, especially on soft woods like pine.
You’ll need sandpaper (80- and 120-grit), a tack cloth, stir sticks, foam brushes, and lint-free rags. For oil-based stains, use brushes designed for oil-based finishes.
This depends on how dark you want the finish. One to three minutes is typical, but don’t exceed the time recommended on the stain’s packaging, or it may become tacky.
Technically, yes, but sanding is crucial for an even finish. Skipping sanding often leads to a blotchy or rough appearance.
More Paint Finish Tutorials
- How to Paint Kitchen Cabinets: Complete Step-by-Step Guide
- Grey Wash Wood Finish
- How to Get the Lime Wash/White Washed Wood Finish without Blue Undertones!
- How to Stain Wood – Step-by-Step Tutorial for Beginners
- How to Whitewash Stain (Plus FAQ & Staining with Minwax Pickling)
- How to Paint a Sideboard: Step-by-Step Guide for a Stunning Makeover

How to Stain Wood - Step-by-Step Tutorial
Learn how to stain wood with this easy step-by-step tutorial for beginners. Tips, tools, and FAQs to help you achieve a flawless finish!
Materials
- 80 grit sandpaper
- 120 grit sandpaper
- Pre-stain wood conditioner – local hardware store
- Stain – local hardware store
Tools
- Tack cloth
- Stir sticks
- 2 Foam brushes
- Lint free rags
Instructions
- The first thing you want to do is prep your wood project for staining. Starting with a low number/coarse grit sandpaper, sand your wood back and forth, with the direction of the grain. Then use a finer higher number/finer grit sandpaper and sand it again in the same manner.
- When your wood is nice and smooth, wipe it down with a tack cloth. This will help remove all the debris leftover from sanding, and prevent your stain from getting gooped up.
- Open your pre-stain wood conditioner and give it a good stir with a stir stick. Using a foam brush, apply pre-stain wood conditioner, in the direction of the wood grain. It will look like watered down glue, but it will dry transparent. Let sit for one to five minutes.
- Wipe off any excess pre-stain wood conditioner with a clean, lint-free towel or rag.
- Now open your wood stain of choice and give it a good stir with a stir stick.
- Using a new foam brush, apply the wood stain to your project going with the grain. If your project is made from wood with a pronounced grain, you may need to dab some stain into the deeper grain, grooves and knotholes, or even apply it against the grain to ensure good coverage.
- Then let your stain sit for one to three minutes. The longer you leave it on the darker it will be.
- Wipe off the excess stain with a clean lint free cloth. Let dry for one hour before applying a second coat or a finishing top coat like polycrylic or wax.
Notes
- If you have any confusion about which sandpaper to use, learn more in my blog post titled Sandpaper Grits and Their Uses – What Do Those Sandpaper Numbers Mean?
- Pre-stain wood conditioner is an optional step when you’re staining a project. But I highly recommend it because it helps to create a lovely smooth finish. Without it, your stain may appear blotchy or uneven when your project is finished.
You don’t want to shake the can to mix it up as bubbles will form that will transfer to your wood project. And once they pop they will leave weird markings in your stain. - If you leave the stain sit for too long, it will become tacky and hard to wipe off. Don’t leave it any longer than the longest recommended time on the stain packaging. If you want a darker look, try a second coat after the recommended drying time, or a darker stain.
Learning to stain wood is one of the most versatile and rewarding DIY skills you can master. Whether you’re working on a new coffee table or refreshing an old piece of furniture, staining wood transforms projects into something truly special. I hope this guide gave you the confidence to tackle your next woodworking adventure—be sure to share your results in the comments or on Pinterest!

Want to see more content like this in your Google searches?
This button tells Google that Home Made Lovely is a source you like, so it can show you more of it.