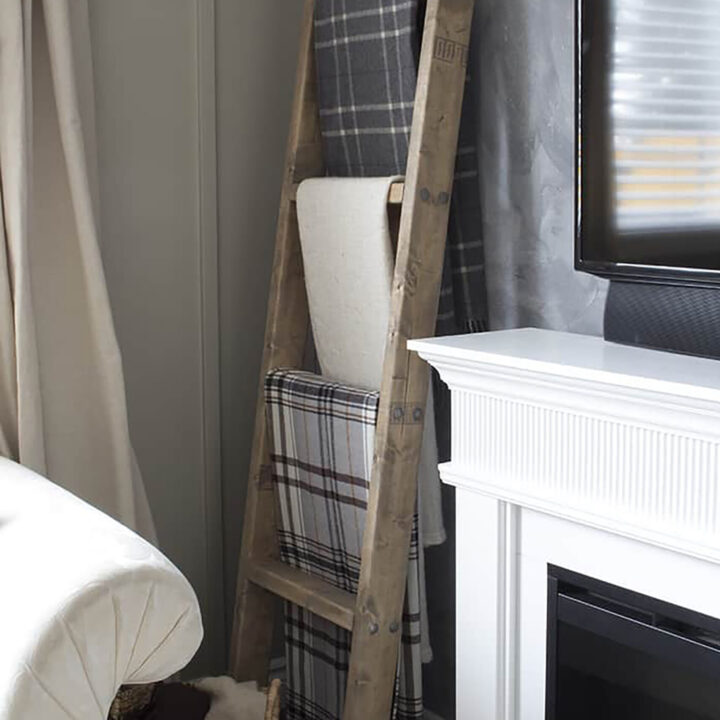
Are you tired of searching high and low for the perfect vintage blanket ladder, only to find them either way too big or wildly expensive? I’ve been there! For years, I wanted a beautiful way to display my favorite throw blankets, but every option seemed out of reach. That’s when Dean and I decided to take matters into our own hands and make one. This simple DIY blanket ladder is rustic, functional, and costs less than $40!
If you’re into budget-friendly DIYs, you’ll love this project. It’s the perfect way to add character to your home without breaking the bank. Speaking of affordable and rustic charm, be sure to check out my post on How to Take a Make a Rustic WoodHeadboard for Less Than $50. It’s another simple project that pairs beautifully with this blanket ladder for a cohesive, cozy look in your home.
DIY Blanket Ladder Made with 2 x 4s
This ladder is as practical as it is charming, and the best part? You only need a few 2x4s, some tools, and a free afternoon to make it. Let’s get started!
Materials:
- 3 – 2″ x 4″ x 8′ lengths of wood
- 16 – 3/8″ x 2 1/2″ carriage bolts
- Sun-bleached oil-based stain
- Dark walnut oil-based stain
- Foam brushes
- Old rags
Tools:
- Compound miter saw
- Drill
- 23/64″ drill bit
- Sandpaper
- Measuring tape
- Hammer
- Bar clamp
- Pencil
Instructions:
1. Cut the side rails
Take two of the 2″ x 4″ x 8′ boards and cut them down to 7′ each. These will be your ladder’s side rails.
2. Cut the rungs
From the third 2×4, cut four 16″ pieces to use as rungs.
3. Sand all edges
Smooth out any rough edges on the side rails and rungs using sandpaper.
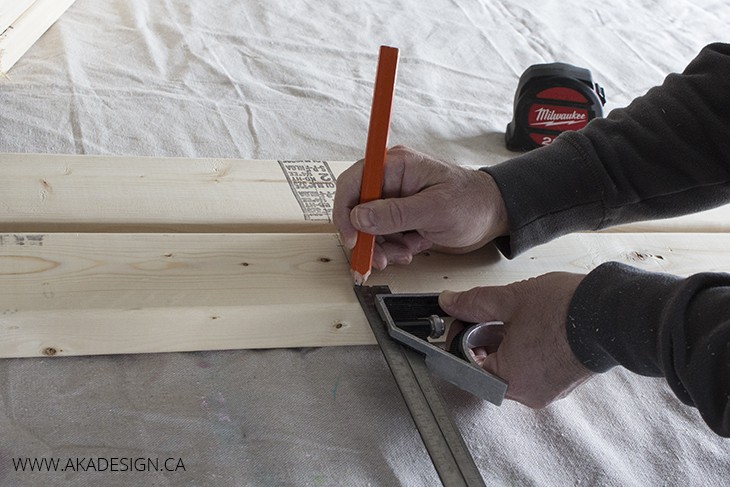
4. Mark the rung positions
On each 7′ side rail, mark the positions for the rungs at 18″, 34″, 50″, and 66″ from one end. Use a square to draw straight lines across the width of the boards.
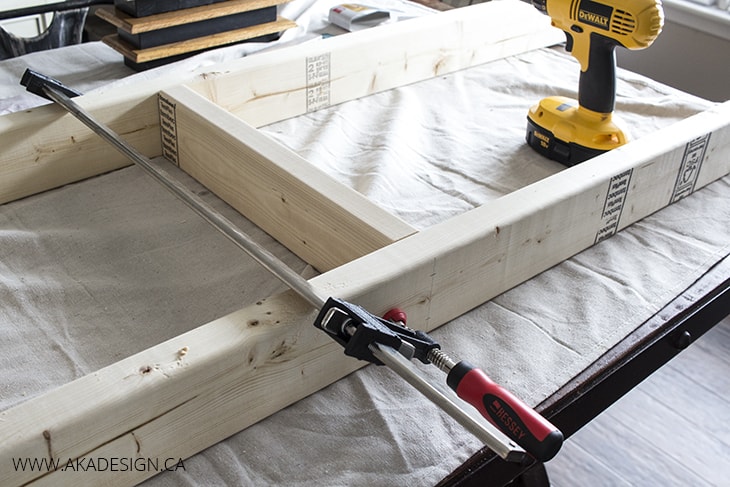
5. Clamp the ladder together
Position the rungs between the side rails at the marked points and clamp them securely in place.
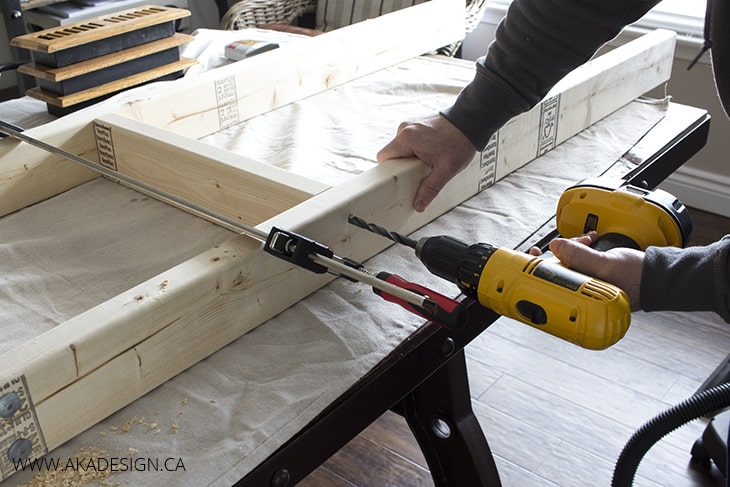
6. Drill holes for bolts
At each marked position, drill two holes, 3/4″ from each edge. Repeat for all rungs. You’ll end up with eight holes on each side rail and sixteen in total.
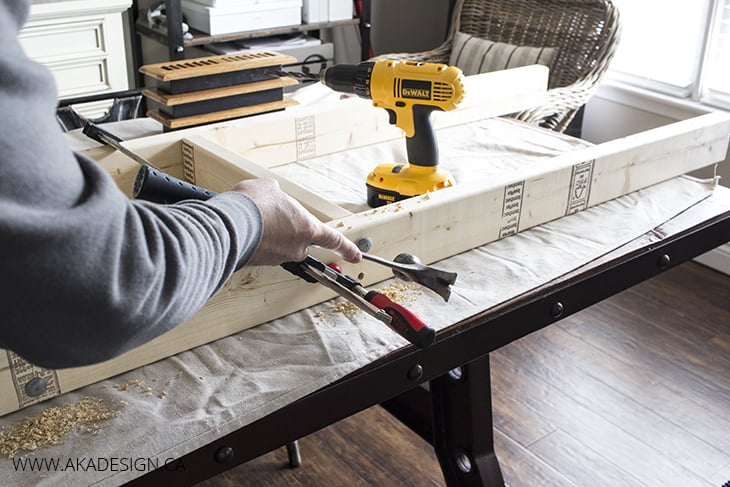
7. Attach the rungs
Hammer one carriage bolt into each drilled hole to secure the rungs to the side rails.
8. Apply the first stain
Using a foam brush, apply the sun-bleached stain to the entire ladder. Let it sit for 5 minutes, then wipe off the excess with an old rag.
9. Layer the second stain
Apply the dark walnut stain over the first layer, let it sit for 5 minutes, and wipe off the excess with a clean rag.
10. Dry and enjoy
Allow the ladder to dry completely until it’s no longer tacky—about 24 hours.
FAQs
Absolutely! Adjust the length of the side rails and the spacing of the rungs to suit your needs.
No, but layering the stains adds depth and gives the wood a beautiful aged look. Feel free to experiment with colors!
Yes, screws are a simpler option, but the carriage bolts add a more rustic, authentic look.
Wipe it with a damp cloth. Avoid soaking the wood to preserve the finish.
More DIY Furniture
- DIY Industrial Wood and Metal Shelves
- DIY Brickmaker’s Coffee Table
- DIY Balustrade Coffee Table + Where to Get Balustrades!
- Ikea Hack: DIY Rustic Cube Shelves
- How to Make a Reclaimed Wood Headboard With New Wood For Less Than $50
- DIY Blanket Ladder Made with 2 x 4s
- DIY Faux Fireplace Mantel
- How to Build a Faux Mantel Shelf (DIY Mantel Shelf Tutorial)
DIY 2x4 Blanket Ladder Tutorial
Learn how to make a DIY blanket ladder with 2x4s for less than $25. A simple, rustic project to display your throw blankets beautifully!
Materials
- 3 – 2″ x 4″ x 8′ lengths of wood
- 16 – 3/8″ x 2 1/2″ carriage bolts
- Sun-bleached oil-based stain
- Dark walnut oil-based stain
- Foam brushes
- Old rags
Tools
- Compound miter saw
- Drill
- 23/64″ drill bit
- Sandpaper
- Measuring tape
- Hammer
- Bar clamp
- Pencil
Instructions
- Cut the side rails: Cut two of the 2″ x 4″ boards to 7′ each for the side rails.
- Cut the rungs: From the third board, cut four 16″ pieces for the rungs.
Sand the wood: Sand all edges and surfaces to remove roughness. - Mark rung positions: On each side rail, mark the positions for the rungs at 18″, 34″, 50″, and 66″ from one end.
- Clamp the pieces: Align the rungs between the side rails at the marked positions and clamp them together securely.
- Drill holes: Drill two holes at each rung location, 3/4″ from each edge of the side rails.
- Attach the rungs: Hammer a carriage bolt into each drilled hole to secure the rungs.
- Stain the ladder: Apply sun-bleached stain with a foam brush, let sit for 5 minutes, and wipe off the excess with a rag.
- Add the second stain: Apply dark walnut stain over the first layer, let sit for 5 minutes, and wipe off the excess.
- Let it dry: Allow the ladder to dry completely for 24 hours before use.
And that’s it! With a few 2x4s and some elbow grease, you’ve got yourself a rustic DIY blanket ladder for less than $40. Whether you’re displaying cozy throw blankets or using it as a statement piece, this ladder brings warmth and charm to any space. I hope this tutorial inspires you to tackle your own budget-friendly project. If you give it a try, I’d love to hear about it in the comments below!

Beautiful!
Thank you!
I love the ladder but I priced the carriage bolts at Lowe’s and they are 1.98 a piece which would come to around $32 for the bolts alone. I was wondering how you were able to make it for $25?
Hi Connie, I don’t believe they were that much when we bought them years ago. I’m sorry if they’ve gone up in price!
Love it. I’ve been thinking about making one too.
Go for it!
I love the bolts on the sides! I’ve made a blanket ladder before but I might have to make this one for the lake house!
The bolts are my favorite part too!
Aren’t you a smart cookie! This is so simple it’s elegant, thank you for sharing. I’ve long hungered after a blanket ladder but the idea of dishing out a small fortune for one was a huge turn off. I don’t know why this never occurred to me. What is sun bleached stain though? I’ve never heard of it.
The sun bleached stain is made by Valspar!
This is the best DIY blanket ladder I’ve ever seen on Pinterest.
I’ve been wanting a blanket ladder for ages, but the directions seem to be so complicated. Love your step by step instructions. It seems so easy. I’m definitly going to give this a try. Thanks for sharing Shannon!
I’m so glad you like it!!!
Love this blanket ladder! Looks fantastic with those cozy plaid blankets!
Love the blankets!
LOVE this Shannon! And I love the fact that you left the wood markings to shine! I’ve never attempted using those carriage bolts before… I’m totally adding them to my shopping list!
Thank you, Donna. Wasn’t sure if I’d like the wood markings, but we were on a tight timeline after Dean was sick last week. I’m glad we left them! The carriage bolts are fun – I love lag bolts too.
Ahhhhh this is fantastic. I’m redoing our master and I need something with height. This might be the perfect project! Love it!
Sounds great!
I really like the stain wood finished you have achieved on the ladder. I think the whole thing looks fantastic.
Thank you so much Claire!
I love the look of this ladder Shannon! What type of carriage bolts did you use and how do you get them to stay without a fastener?
Just regular carriage bolts were used. The hole is just the right size for the bolt. You could also glue them in if you wish.
Hi, do you sell these?
Unfortunately not currently. We’ll let you know if we do in the future though!
This Is lovely! I’ve been wanting to make one for a while now, but am on a budget. How did you come about to say these were less than $25? My figure came up to a lot more than that. I have a drill and that’s about it.
Hi Kiki, The project assumes that you have the necessary tools.
Hey! Thanks for sharing your tutorial. The only part that bothers me is that the printing on the 2×4 is visible on the sides even after the staining. Any way to get rid of that? Thanks!
If you sand it off before you stain it, you’ll be fine. I didn’t mind the look of the stamps so I didn’t.
Thanks for the prompt reply!
Two girlfriends and I got together for a day and we all made one of these. They pretty much look identical to yours, minus the writing on the wood…we sanded our writing off. Thanks for the great directions and pictures. We are all pretty pleased. My husband keeps joking my ladder is the most photographed ladder ever…hahaha…I’m just so thrilled with the way it turned out. Thank you.
I’m so glad you made your own – and your friends too!
I’m going to build a few as gifts.
What a great idea, Jesse! Have fun. I’m sure the recipients will love them!
Love this ladder! What size drill bit did you use to make the holes for the carriage bolts?
Nevermind…just saw it in your list!!
I love it with the 2×4’s ! I didn’t think I would but I love how sturdy it looks…plus I have 2×4’s in my basement 🙂
Do you put an angle on the bottoms or do they sit fine just leaned against the wall?
We didn’t angle them…but if you want to you can! I’d anchor it to the wall if you have kids or climbing pets!
Thank you so much for your blog on the blanket ladder. You guys made it so simple to follow, everything was covered and when I made it, i was so pleased with the end result.
Oh I’m so glad! 😊☺️ It’s so satisfying to build something lovely, isn’t it?!
There’s no mention of what angle to cut the sides for leaning onto the wall?
That’s because we didn’t cut any angles for that. We just propped it up as is. It stayed just fine! (If you have little kids though, I’d suggest affixing it to the wall with a strap or bracket.)