I’ve always loved the look of the Restoration Hardware Balustrade Salvaged Wood Coffee Table. Timothy Oulton really outdid himself with that design! But after our last pricey experience with an RH table—and considering how many projects we’ve tackled ourselves—I knew I could create something just as beautiful for much less. With a bit of creativity and determination, I dreamed up a way to DIY a balustrade coffee table that’s not only stylish but also perfectly customized for our space.

If you love furniture projects like this one, check out my How to Stain Wood – Step-by-Step Tutorial for more tips on achieving the perfect finish.
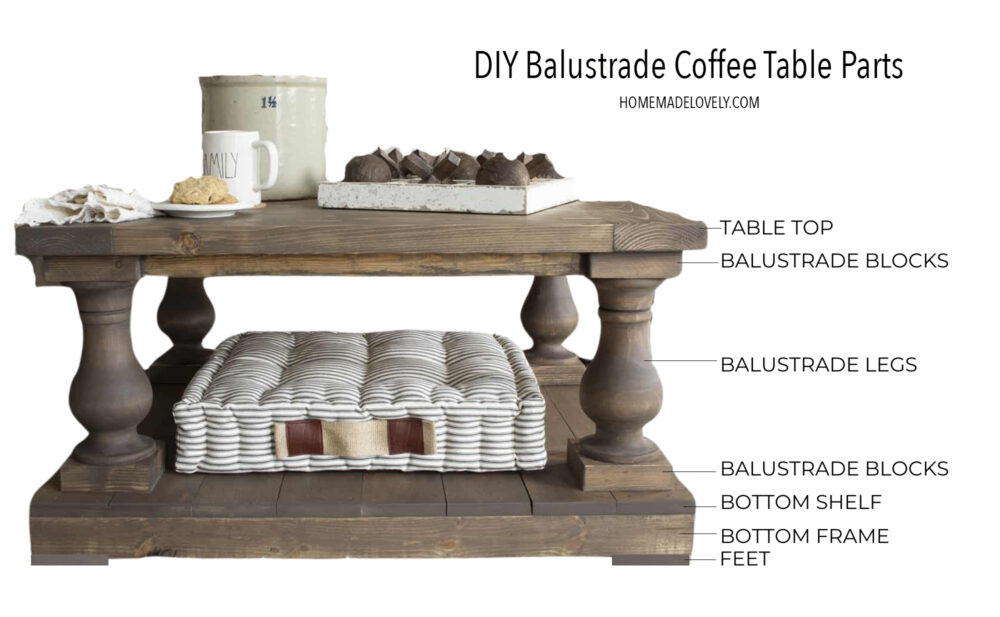
Our DIY Balustrade Coffee Table: Step-by-Step
Note: Our table plans were adapted from Ana White’s Balustrade Coffee Table plans. Her plans include detailed drawings and instructions for building a rectangular table. While we customized our table to make it square (31″ x 36″) to fit our space, her tutorial is a fantastic resource, especially if you prefer a longer rectangular table.
Materials Shopping List
- Wood:
- 5 – 1×6 @ 6 feet long
- 4 – 2×4 @ 8 feet long
- 1 – 1×4 @ 15” long
- 4 – 2×6 @ 8 feet long or stud length
- 4 – turned balustrade legs (we sourced ours from Twig and Anchor, but they’re now available on Amazon.ca)
- Hardware:
- 1-1/4” pocket hole screws
- 2-1/2” pocket hole screws
- 2” or longer wood screws
- Nails for securing feet (1-1/4” to 2”)
- Finishes:
- Minwax Pre-Stain Wood Conditioner
- Varathane BriarSmoke stain
- Varathane White Wood Grain Enhancer
- Dark wax
Tools
- Tape measure
- Speed square
- Pencil
- Safety glasses
- Hearing protection
- Kreg Jig
- Drill
- Circular saw
- Brad nailer
- Power sander
Cut List for a Square Table
- Bottom Shelf Boards (1×6):
- 10 – 1×6 @ 31″ long
- Frame Supports (2×4):
- 2 – 2×4 @ 31″ long
- 2 – 2×4 @ 36″ long
- Horizontal Leg Supports (2×4):
- 2 – 2×4 @ 20″ long
- 2 – 2×4 @ 31″ long
- Feet (1×4):
- 4 – 1×4 @ 3-1/2″ long
- Balustrade Blocks (2×6):
- 8 – 2×6 @ 5-1/2” long
- Top Boards (1×6):
- 10 – 1×6 @ 36″ long
- Top Blocks (2×6):
- 2 – 2×6 @ 31″ long
Instructions
1. Build the Bottom Shelf
- Cut the 1×6 boards to create a 31″ x 36″ bottom shelf.
- Drill pocket holes along one edge of each board and join them together. Trim the edges with a circular saw for a clean finish, if needed.
2. Assemble the Bottom Frame
- Cut the 2×4 pieces to size for the bottom frame (31″ and 36″).
- Attach the frame to the bottom shelf using pocket screws for a sturdy base.
3. Attach Feet
- Cut and attach 1×4 pieces as feet at each corner of the bottom shelf frame. Secure them with glue and brad nails.
4. Add Top and Bottom Blocks
- Attach 2×6 blocks to the tops and bottoms of the balustrade legs to connect the structure.
5.Attach Balustrade Legs
- Glue and screw the balustrade legs/blocks to the bottom shelf, from underneath.
6. Connect the Legs
- Use the 20″ and 31″ 2×4 pieces to connect the legs with pocket screws.
7. Build the Tabletop
- Assemble the 1×6 boards to create the tabletop. Join them with pocket screws, ensuring a snug fit.


8. Attach the Tabletop
- Secure the tabletop to the frame by screwing through the horizontal supports into the underside of the tabletop.
9. Sand and Condition
- Sand the entire table smooth, then apply Minwax Pre-Stain Wood Conditioner to ensure the stain absorbs evenly.
10. Stain and Finish
- Apply Varathane BriarSmoke stain in sections, wiping it off immediately for a lighter finish.
- Once dry, add Varathane White Wood Grain Enhancer for dimension.
- Seal the table with dark wax, buffing it to a smooth finish.
Where to Get Balustrades
When Dean and I started this project, we quickly realized we needed balustrade legs to pull off the look—but we weren’t about to buy a lathe and turn them ourselves. At the time, we ordered ours from Twig and Anchor, a Canadian supplier. Sadly, they’ve since gone out of business.
For anyone looking for balustrade legs now, here are two excellent options:
- U.S. Source: Click here for unfinished balustrade legs (Osborne Wood via Amazon affiliate link).
- Canadian Source: Click here for unfinished balustrade legs (Amazon.ca affiliate link).
The Amazon.ca legs are an affordable and convenient option for Canadian DIYers, and they’ll work beautifully for a similar project.


FAQs
We originally purchased ours from Twig and Anchor, but they’re no longer in business. For Canadian readers, similar legs are available on Amazon.ca and Etsy. U.S. readers can check out Osborne Wood for a great selection.
It cost around $350 since we already had most tools and finishes on hand.
Yes! We adjusted Ana White’s plans to make our table square (31″ x 36″) instead of rectangular.
We used Varathane BriarSmoke stain, White Wood Grain Enhancer, and dark wax to achieve a rustic yet refined look.
More DIY Furniture
- DIY Industrial Wood and Metal Shelves
- DIY Brickmaker’s Coffee Table
- DIY Balustrade Coffee Table + Where to Get Balustrades!
- Ikea Hack: DIY Rustic Cube Shelves
- How to Make a Reclaimed Wood Headboard With New Wood For Less Than $50
- DIY Blanket Ladder Made with 2 x 4s
- DIY Faux Fireplace Mantel
- How to Build a Faux Mantel Shelf (DIY Mantel Shelf Tutorial)

DIY Balustrade Coffee Table
Learn how to build a stunning DIY balustrade coffee table inspired by Restoration Hardware. Full tutorial + where to find balustrade legs!
Materials
Wood
- 5 - 1x6 @ 6 feet long
- 4 - 2x4 @ 8 feet long
- 1 - 1x4 @ 15” long
- 4 - 2x6 @ 8 feet long
- 4 - turned balustrade legs
Hardware
- 1-1/4” pocket hole screws
- 2-1/2” pocket hole screws
- 2” or longer wood screws
- Nails (1-1/4” to 2”)
Finishes
- Minwax Pre-Stain Wood Conditioner
- Varathane BriarSmoke stain
- Varathane White Wood Grain Enhancer
- Dark wax
Tools
- Tape measure
- Speed square
- Pencil
- Kreg Jig
- Drill
- Circular saw
- Brad nailer
- Power sander
Instructions
- Build the Bottom Shelf
- Cut the 1×6 boards to create a 31″ x 36″ bottom shelf.
- Drill pocket holes along one edge of each board and join them together. Trim the edges with a circular saw for a clean finish if needed. - Assemble the Bottom Frame
- Cut the 2×4 pieces to size for the bottom frame (31″ and 36″).
- Attach the frame to the bottom shelf using pocket screws for a sturdy base. - Attach Feet
- Cut and attach 1×4 pieces as feet at each corner of the bottom shelf frame. Secure them with glue and brad nails. - Add Top and Bottom Blocks
- Attach 2×6 blocks to the tops and bottoms of the balustrade legs to connect the structure. - Attach Balustrade Legs
- Glue and screw the balustrade legs/blocks to the bottom shelf from underneath. - Connect the Legs
- Use the 20″ and 31″ 2×4 pieces to connect the legs with pocket screws. - Build the Tabletop
- Assemble the 1×6 boards to create the tabletop. Join them with pocket screws, ensuring a snug fit. - Attach the Tabletop
- Secure the tabletop to the frame by screwing through the horizontal supports into the underside of the tabletop. - Sand and Condition
- Sand the entire table smooth, then apply Minwax Pre-Stain Wood Conditioner to ensure the stain absorbs evenly. - Stain and Finish
- Apply Varathane BriarSmoke stain in sections, wiping it off immediately for a lighter finish.
- Once dry, add Varathane White Wood Grain Enhancer for dimension.
- Seal the table with dark wax, buffing it to a smooth finish.
Notes
Cut List for a Square Table
Bottom Shelf Boards (1×6):
- 10 – 1×6 @ 31″ long
Frame Supports (2×4):
- 2 – 2×4 @ 31″ long
- 2 – 2×4 @ 36″ long
Horizontal Leg Supports (2×4):
- 2 – 2×4 @ 20″ long
- 2 – 2×4 @ 31″ long
Feet (1×4):
- 4 – 1×4 @ 3-1/2″ long
Balustrade Blocks (2×6):
- 8 – 2×6 @ 5-1/2” long
Top Boards (1×6):
- 10 – 1×6 @ 36″ long
Top Blocks (2×6):
- 2 – 2×6 @ 31″ long
I’m so thrilled with how this DIY balustrade coffee table turned out! It perfectly fits our space, looks high-end, and saved us hundreds of dollars. If you’ve been dreaming of a balustrade table but balking at the price, this DIY is a fantastic option. Let me know in the comments if you have any questions—I’d love to help you create your own!

It turned out SO beautifully Shannon! And I love that you sourced those legs for us Canadians as well! Thanks for sharing!
Thanks, Kristi!
Bruno Gougeon
Hi Shannon! I love your balustrade coffee table! It’s absolutely gorgeous. I so wish I had a handy husband but I do not….so my sister and I are going to attempt to build one! Ha Ha! Wondering if you and Dean might be able to help us get started by helping us determine what size to cut our wood. The plans are hard to follow as I am needing a square table that is 42″ X 42″. Once I know the size to cut my wood pieces, I think we’ll be able to follow the plans for the construction part! thank you, Melissa
Hello, I am in love with this table and have been comparing your table with ana’s, I love the size table you went with! I see ana’s cut list but i was wondering what your cut list was as far as length so that i can make mine the same size as yours!
Hi Samantha,
Unfortunately, we didn’t put together a cut list and winged it a little…which is why we linked to Ana’s site for the build. I’m sorry!
I love the table, but could you tell me what size boards you used on the bottom? I am needing your exact build size of 31×36 and I see you have 8 boards on the bottom and I for the life of me cannot figure out how any combination of wood gets you to 36 inches in width. (8 -1×6 boards would be 44 in wide and 8- 1×4’s would be 28 in.) They all look to be the same size in your picture, I am truly dying to know how this worked to make the 31×36 table. I figured the top out (2-2×6’s @ 31in long on both ends with the 5 boards in the center cut to 25in each totaling 36 inches. The 3 center boards are 2×6 and the 2 outside boards are 2×8 (7.25+5.5+5.5+5.5+7.25=31in) Did you blend boards together? 6 1×6’s totaling 33 inches in width and 2 1×2’s, one on each end with wood filler?? My OCD is in hyperdrive and I would greatly appreciate the info!!
Hi JD,
Because we made a different sized table than the Ana White plans, we sourced and used 1″ x 5″ boards for the bottom, rather than 1″ x 6″ boards. Another option is to rip 1″ x 6″ boards – this has the added benefit of removing any rounded edges so the boards fit tightly together. We did not use any wood filler, since I dislike how it takes stain.
I hope that helps to clarify.
Shannon
Thank you SO much Shannon! Greatly appreciate your answer! I don’t think I have come across 1×5 but I have honestly never looked lol 😉 I will now! Thanks so much 🙂
🙂 You are SO welcome!
Exactly what I want.. Im in canada and the link for the legs says no longer available 😔 but there are others on etsy.. your colour is perfection..
Hi! Love the table and the stain you went with. We are currently having a custom kennel made with a similar style and going back and fourth with the stain color. I’m curious if you have a picture of the blanket ladder that you did not wipe off stain right away to see just how much darker it looks? Thank you!
What color and product did you use to finish the table
All of the finishing instructions are included in the blog post/article!