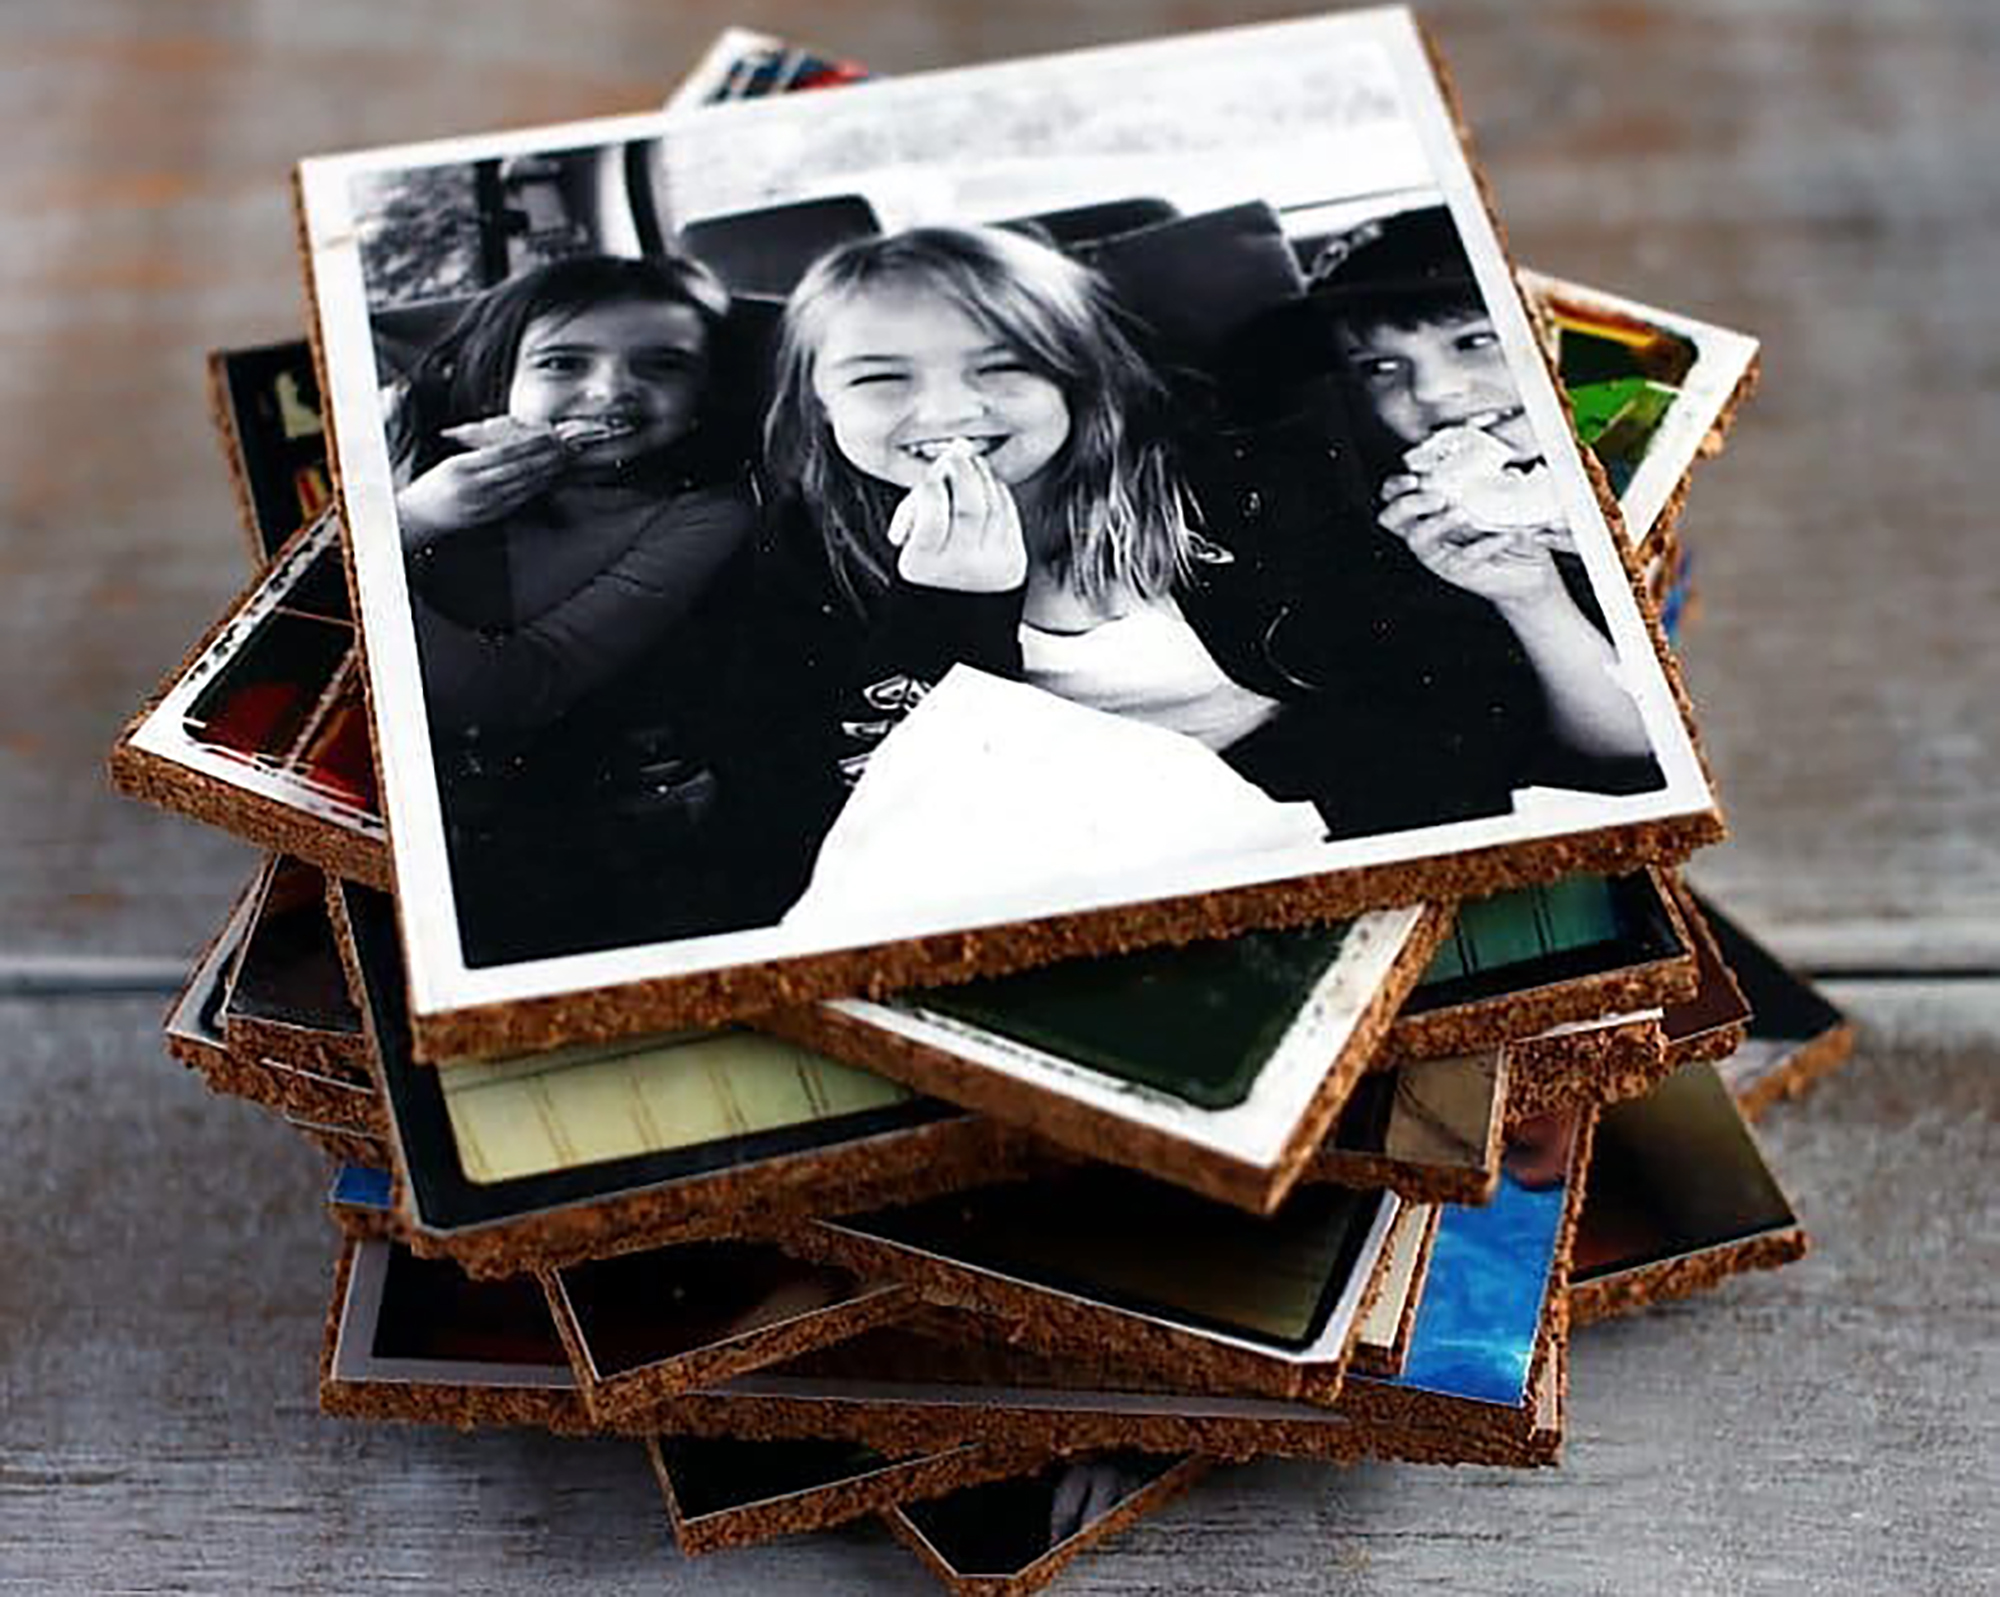
There’s something special about holding a photo in your hands, isn’t there? I love scrolling through my phone as much as the next person, but sometimes, I really miss the tangible memories of photo albums. That’s what inspired me to create these DIY photo coasters—a fun way to turn your favorite snapshots into something practical and beautiful.
If you’re looking for more creative ways to incorporate photos into your décor, you might love my Photo Transfer Project tutorial. It’s another fun way to showcase your memories!
(I was inspired by A Beautiful Mess Photo Idea Book for this project.)
DIY Photo Coasters Tutorial
Supplies
- cork
- photo prints
- laminate sheets (sticky clear vinyl type)
- Mod Podge
Tools
Instructions
1. Prepare Your Cork Squares:
Use a trimmed photo as a guide to trace squares onto your cork tiles. Cut out each square using scissors or a utility knife. (If using a knife, protect your table with a cutting board or mat.)

2. Cut Laminating Sheets:
Trace squares onto the back of your laminating sheet or sticky vinyl using the same trimmed photo. Cut out one square for each photo.

3. Protect Your Photos:
Peel the backing off a vinyl square and carefully stick it to the front of a photo. This will protect the photo from spills. Repeat for all your photos.
4. Assemble Your Coasters:
Apply a thin layer of Mod Podge or glue to the top of a cork square. Press the photo onto the cork and smooth it out. Repeat with the remaining cork squares and let them dry completely.

Tips for Success
- Add Extra Protection: For extra durability, apply a thin layer of Mod Podge over the laminated photo and let it dry completely before using.
- Customize Your Coasters: Try using different shapes, such as circles or hexagons, for a unique look.
- Get Creative with Photos: Use themed sets, like vacation memories or family portraits, for personalized gifts.

FAQs
Yes, but make sure they’re printed on durable paper, and use vinyl or laminating sheets to protect them.
While the vinyl offers some protection, I recommend wiping them clean with a damp cloth rather than soaking them.
Cork tiles are available at craft stores, dollar stores, or online. You can even repurpose old cork boards!
Yes! You can use Mod Podge as a protective layer, but keep in mind it won’t be as spill-resistant as vinyl.
More Home Decor Crafts
- DIY Topiary Trees from Dollar Store Supplies
- Embroidery Hoop Orbs – Easily Make Your Own
- DIY Moss Topiary Balls | How to Make a Topiary
- Photo Coasters – Make Your Own Picture Coasters
- DIY Wood Bead Garland with Tassels & Tag
- Mod Podge Photo Transfer: Easy Canvas Art How-To
- How to Make a Magnolia Leaf Wreath on the Cheap!
- How to Make a Hand Lettered Canvas Sign the Easy Way (No Skills Needed!)
- How to Make a DIY Floating Frame to Enhance Your Art

Make Your Own Coasters - DIY Photo Coasters Tutorial
Materials
- cork
- photo prints
- laminate sheets (sticky clear vinyl type)
- Mod Podge
Tools
- ruler
- utility knife
- pencil
Instructions
- Using one of your prints trimmed to the size and shape you like (mine were 4″x4″), trace squares onto cork tiles. Trim each square using scissors or an exacto knife and a ruler. If you use a knife be sure to protect your table surface with a glass cutting board or a self-healing mat. Set aside.
- Also using one of your prints trimmed to size, trace squares onto back of vinyl book protector. This is the stuff libraries used to use to protect paperback books. (Do they still do that?) Trim each square of vinyl to size. You could also you laminating sheets.
- Peel backing off of one vinyl square and adhere to front of one photo. If your photos are glossy you should be able to reposition vinyl if necessary. This will protect your photos from spills. Repeat for all photos.
- Using a brush, apply Mod Podge/glue to a square of cork. Then affix photo to cork. Repeat for each photo and let dry.
And there you have it—a creative way to turn your favorite memories into something you can use every day. These DIY photo coasters are perfect for your coffee table, a thoughtful gift, or even a fun way to display your favorite moments. I hope this project brings a little extra joy and nostalgia into your home!
Have you made photo coasters before? Or do you have other creative ways to display your photos? I’d love to hear your ideas in the comments below. If you try this project, let me know how it turns out—I can’t wait to see what you create!

Want to see more content like this in your Google searches?
This button tells Google that Home Made Lovely is a source you like, so it can show you more of it.
I miss albums! I was showing our kids our wedding album the other day. Ha! Ha! I LOVE these. Such a sweet idea. Maybe I’ll do them with beach images of our family. x
Beach pics would look so great!!!
What a great idea!! They came out so beautifully 🙂 you have a beautiful family
Seems everyone likes to bring me back cork coasters of the tropical flora and critters of their holiday destination and i was going to purge them to the Salvation Army over winter. Then I got the idea to recycle these myself with modge podging pics of my horses overtop instead. Thanks for the inspiration to get back to this rainy day project. Hardest thing seems just picking out the pics! Great idea on the library bk vinyl cover Where did u buy that?
Great idea to reuse other cork coasters! I actually found the book vinyl in a roll at the dollar store. Michael’s or even etsy may have some too.
Great idea! I, too, miss photo albums, and you are right, there is never enough wall space to display all the pictures I would like to display. This is a great and useful idea. Good gift idea, too.
Thistlewoodfarms.com has a great picture wreath project. I haven’t made one (yet), but it’s another good way to get a lot of pictures displayed in a small area. Mommymoment.ca has a picture lampshade idea that is cute, as well.
I’ve been “lurking” for awhile–you have a great blog. I appreciate how you have a “normal” house and have done so many attractive things to it–my house is modest in size and it’s inspirational to find someone who has done what I am trying to do–making a modest house live large!
It would be a fun gift – Father’s Day is coming! I have see KariAnne’s wreath but not MommyMoment’s lampshade. I’ll have to check it out. Thank you for the compliment – our house is about 1300 square feet and we try to make the most of it. 🙂
What a perfect idea for my IG photos — thank you!! I liked the idea of “wallpapering” the side of our fridge with them; however, we use that as more of an organization center. This project is clever and practical! I’m also thinking that it could be used for Father’s Day here as well. Thanks for posting!!
It would be a perfect project for Father’s day!
Hello….where can you buy vinyl book protector paper? Thanks!
I bought mine at the dollar store! (Dollarama)
I love this idea and can’t wait to make these. Would love to capture all the places we have been on coasters!
When you use a hot beverage on the finished coaster, does it leave a “melted mark” circle? I used a paint sealer on mine instead of the clear plastic, and it isn’t very durable…I am very disappointed. Perhaps you can help?
Nope, never had the circle issue.
Hi My photos aren’t really sticking, I left them overnight to dry then in the morning I checked them and they lifted pretty easy. Any tips? Thanks
Hmm. Did you try putting the Mod Podge on both the cork and the photo back?
After a summer of interning at the acquisitions & processing department of my university library, I can assure you that we still use laminate to protect our paperbacks 🙂
I knew there had to be some good crafty uses for it – I will have to try this some time soon!
I’ve seen so many tutorials for photo coasters, but never one using vinyl or laminating sheets as a topcoat. Very clever!
I tried a few of these last night. I used photos printed on regular photo paper and the mod podge caused the colors to bleed. Were your photos printed on photo paper? Do you think that will make a difference? I just saw Wal-Mart prints 4×4 photos, so I am having some printed to pick up tomorrow and give a try. Thanks for the info.!
I used actual photo prints, yes!
Hello! Just wondering how these have held up? I have found another tutorial that uses an epoxy & tiles but I like this one too! Looking for something durable.
They’ve held up great!!!
I am interested in making my own cork roll coasters as wedding favors. I plan to personalize them with a stamp of the date, initials and a thanks you. My question would be if you have any tips for making them more durable/ less flexible.
Is there some kind of coat in I should cover it with after I stamp them or layer the bottom with something?
Um, you could try gluing them to inexpensive tiles? Or double the layers?
Hi. I really like this idea! Here in Oregon, many of the stores have their own 1 hour or immediate printing of photos. These are usually quite inexpensive options, (a mere 20cents or so per photo, no limits or minimum quantities )and you get them in an hour or much less! (I can get them started if 1 hour, and shop until they are done).
This beats the 12/$6 price!
So you only applied one layer of ModPodge, one time between the photo and the cork? Did you have to apply anything to the top of the plastic sheet protector? I found the “clear contact paper” I have at home is a little hazy looking and won’t want that look. but I can see from your photos, yours don’t have that hazy look. any thoughts?
Yes, that is correct. I only applied ModPodge between photo and cork. The clear contact paper I found was not hazy or colored. Maybe look for some that is clearer?