When we decided to update our kitchen years ago, I never thought walnut butcher block counters would become one of my favorite features. I’ll admit, I was a little skeptical at first—I’d seen butcher block that looked cheap and flimsy in other homes. But after eight years of living with these counters, I can confidently say they’ve been a beautiful and practical choice, even with a few signs of wear.
If you’re considering butcher block counters or wondering how they hold up over time, let me take you through the process of installing, finishing, and maintaining them—plus what I’ve learned after nearly a decade of daily use.

Why We Chose Walnut Butcher Block Counters
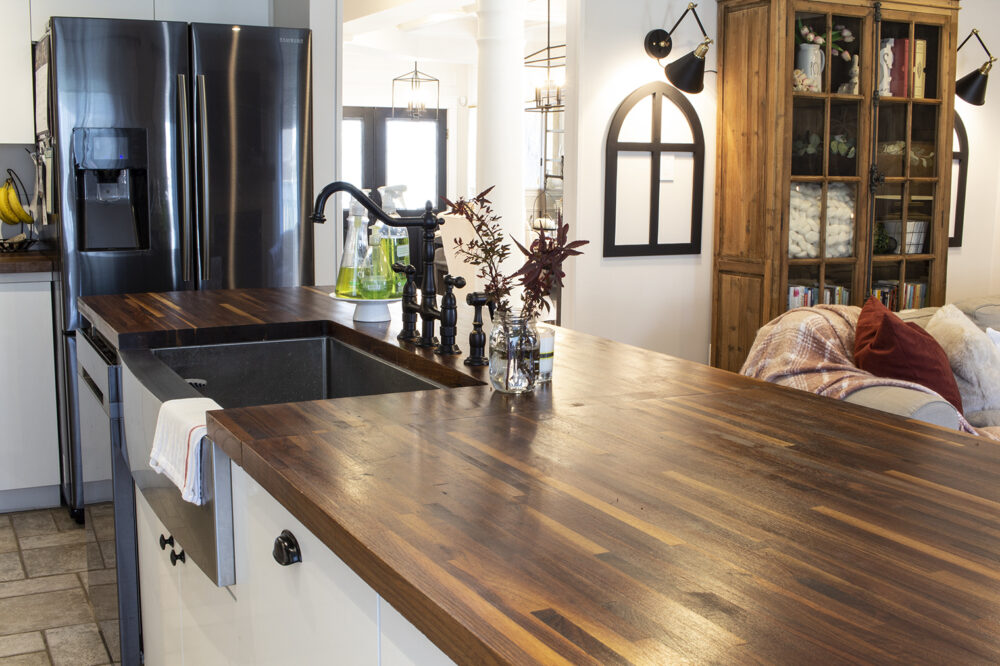
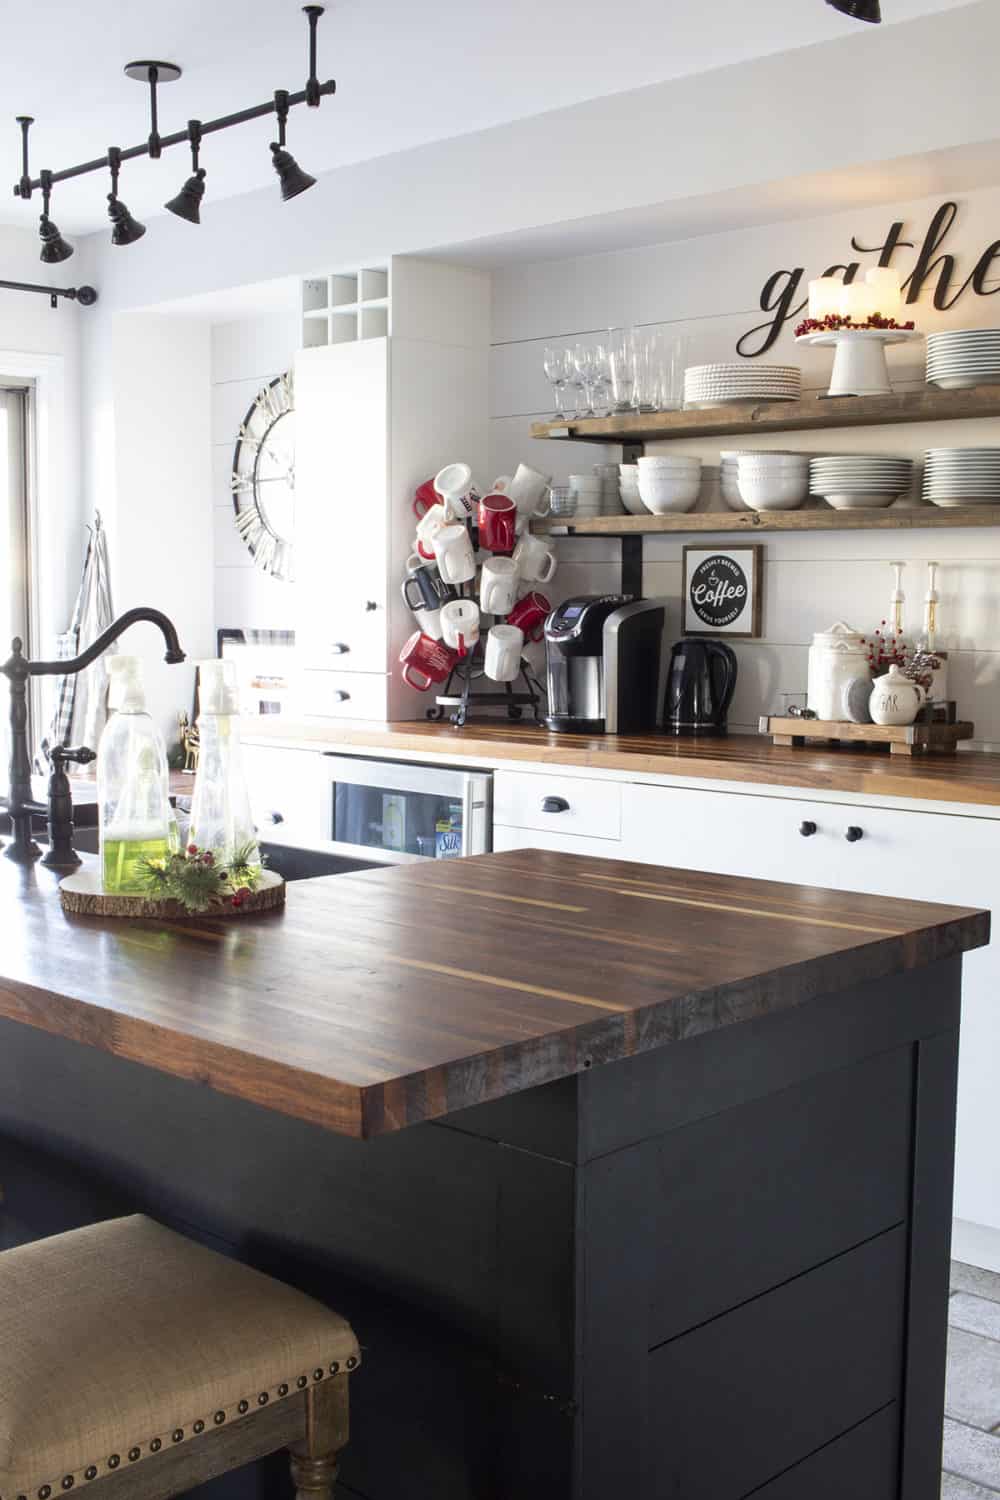
When planning our kitchen makeover, I wanted counters that would add warmth, charm, and a bit of character to the space. We chose American Walnut butcher block for its rich tones and timeless appeal. The counters came unfinished, giving us the opportunity to choose the perfect sealer for durability.
Initially, I was caught up in finding a food-safe finish, thinking it was a must for counters. But since we weren’t planning to chop or prepare food directly on the surface, we prioritized a sealer that would stand up to water and wear. After researching, we landed on Waterlox, which promised a durable, waterproof finish perfect for our needs.
How We Installed and Finished the Butcher Block
The process of sealing and installing butcher block counters takes some patience, but it’s absolutely doable for a DIY project. Here’s how we did it:
1. Lightly Sand Raw Counters
We gave the unfinished counters a light sanding with 220-grit sandpaper and a palm sander. This smoothed the surface and prepped it for sealing.
2. Seal (with Waterlox)
Using a mask and gloves and working in the garage (the fumes are no joke!), I applied:
- Two coats of Waterlox Original Sealer for water resistance.
- One coat of Waterlox Satin Finish for a beautiful, subtle sheen.
Each coat was applied 24 hours apart, allowing time to dry fully between applications.

3. Install
Once the finish cured, we brought the counters inside and secured them to the cabinets from underneath. For our undermount sink, we made sure the edges were sealed carefully to prevent water damage.
The result? A stunning, rich finish that beads up water and wipes clean with ease. Even with heavy use, the counters looked amazing.


Maintenance and Real-Life Experience After 8 Years
Fast forward nearly a decade, and these counters are still a highlight in our kitchen. Here’s what we’ve learned:
Pros:
- Timeless Style: The walnut butcher block adds warmth and charm that other materials just can’t replicate.
- Durability: The counters have held up well, even with a busy family using the kitchen daily.
- Easy Repairs: Minor scratches? I’ve buffed them out with—you guessed it—actual walnuts! (The natural oils in walnuts work wonders on small imperfections.)
Cons:
- Wear Around the Sink: The area around the sink shows some wear and discoloration from water exposure. Regular re-oiling helps but doesn’t completely prevent this.
- Maintenance Needs: To keep the counters looking their best, I’ve used butcher block oil periodically. It’s not difficult but does require consistency.


Tips for Caring for Butcher Block Counters
If you’re considering butcher block, here are my top maintenance tips:
- Use a Waterproof Finish: Choose a product like Waterlox to protect the surface from water and stains.
- Reapply Oil Regularly: Keeping the wood nourished helps prevent drying and cracking.
- Clean with Care: Avoid harsh chemicals; a damp cloth and mild soap are enough for everyday cleaning.
- Address Scratches Quickly: For small scratches, rub them with a walnut or re-sand and refinish the area if needed.

Are Butcher Block Counters Worth It?
While I would for sure consider butcher block counters again for their rustic charm and warmth, I’m not 100% sure I’d choose them (I like change and variety). That said, they’re incredibly durable compared to many other materials and age beautifully, especially in a rustic or farmhouse-style home. The imperfections over time add character, making them a great choice if you love a lived-in, welcoming look.
FAQs
If you plan to prep food directly on the counters, use a food-safe finish like mineral oil. For everyday use, a durable sealer like Waterlox is better for water and stain resistance.
Every 6-12 months, depending on use. If the counters look dry or water stops beading on the surface, it’s time to oil them.
With proper sealing, they’re very water-resistant. However, areas near sinks need extra care to avoid long-term damage.
More DIY Decor Projects
- Shiplap and Barn Beam Fireplace Mantel Makeover
- DIY Range Hood Cover: Easy Custom Kitchen Upgrade
- Build a Faux Mantel Shelf For YOUR House to Decorate Each Season!
- DIY Balustrade Coffee Table + Where to Get Balustrades!
- DIY Faux Floral Arrangement: Feminine Yet Rustic Crate
- How to Seal Butcher Block Counters for a Durable Finish
- DIY Farmhouse Bathroom Mirror Tutorial
- How to Make a Large Hanging DIY Chalkboard
- Walnut Butcher Block Counters: Installation and 8-Year Review
Our walnut butcher block counters have been a labor of love, but they’ve rewarded us with years of beauty and functionality. If you’re looking for a counter material that adds warmth and character to your kitchen, butcher block is definitely worth considering. Just be ready to show them a little TLC along the way!
What about you? Have you ever considered butcher block counters, or do you have them in your kitchen? I’d love to hear your thoughts and experiences! Share your questions, tips, or stories in the comments below—I can’t wait to chat with you!

??
Wowzer! Gorgeous!
I can’t access your website from South Africa ?. This has happened since last week. Before that I had no issues reading your blog.
Sorry. I had to tighten some site security. Try again, I think I’ve made it possible!
Thank you! Working again.
The butcher block is stunning and pops next to the stainless steel. I love it!
Yes! The dark butcher block really does go well with both the stainless and the black stainless!
I Love Love Love the stainless/walnut combination! I wouldn’t have thought to put the two together but it WORKS!!
It’s true, it’s not a typical pairing. But we love it!
The butcher block counters are gorgeous and ooh that sink! Love seeing this come together and I can’t wait to see it all finished next week!
Oh that sink, is right! I LOVE that thing. It’s been my saving grace since we started this reno…all.the.things fit into it!
LOVE IT !
Thanks, Monique!
Beautiful!
Thank you!
Gorgeous. I can’t wait to see it all finished!
We can’t wait either!
Lovely!
Thanks, Heather!
I love your counters! You and your husband are truly talented to tackle all these projects. The color of the counters go perfect with the cabinets and make the kitchen look warm and inviting. Thanks for sharing all your great ideas and all your trials too. It will help others avoid the same problems you encountered. I look forward to seeing it all finished.
My hubby is indeed talented and amazing! 🙂 Thank you, Mary.
Wow it’s looking so good! I love the new counters. Can’t wait to see it all done. Hope you get everything you need in time.
Thanks, Dannyelle. I hope so too!
I am loving those counters–so pretty! Good luck on your finishing touches, see you next week at the reveal 🙂
Who knew that LL sold more than flooring. Those counter tops are gorgeous! I love the combination of charcoal gray, white and wood finishes. Giddy with anticipation to see the final results. You are blessed with skills girl!
I know, right?! I didn’t know until recently either.
Shannon!!! That butcher block is so stinkin’ gorgeous!! I love the dark rich tone of the wood. I can’t wait to see your reveal next week!
I really do love the walnut too!
Whoa! Those are just gorgeous! I love the sturdy thickness of them and how the wood just warms everything up. Lucky you! Can’t wait to see it all completed. Great, great job!
Thanks, Tracy. I love how thick they are too!
Those countertops are gorgeous!
Thank you, Shelle. They really are!
I love your kitchen! We are planning a kitchen remodel and have been debating the same counter top. Thank you for sharing detailed info on the treatment you used. I was leaning toward food grade but was worried about water damage. How is it holding up?
It is holding up extremely well! I am very happy that we went with the Waterlox. Especially around the undermount sink!
Did you use a stain on your walnut countertops before using the waterlox or did they come that way?
Nope! They’re Walnut, so they just got darker/richer when we applied the Waterlox.