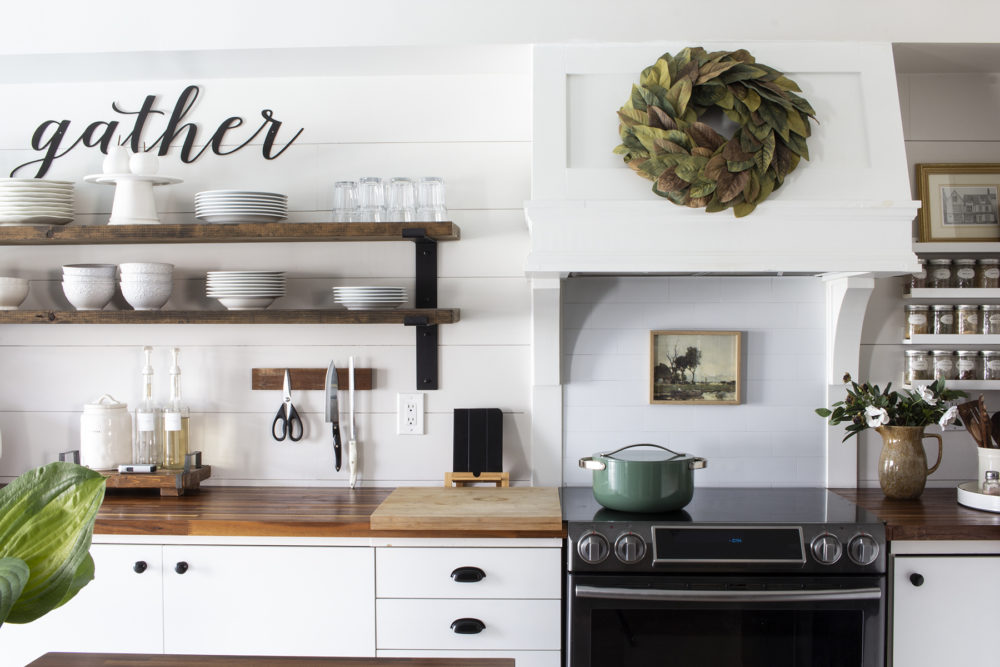
When we started planning our modern farmhouse kitchen makeover, I knew I wanted a statement piece above the stove—a custom range hood cover. A store-bought one didn’t quite fit the look I was going for, so Dean and I decided to build our own. It turned out to be the perfect blend of function and farmhouse charm! If you’ve been dreaming of upgrading your kitchen, let me show you how to create your own DIY range hood cover.
Before we dive in, if you’re tackling a full kitchen refresh, you might also enjoy my guide to DIYing a Shiplap Kitchen Backsplash. Together, these projects can totally transform your space!
Build Your Own Custom DIY Range Hood Cover
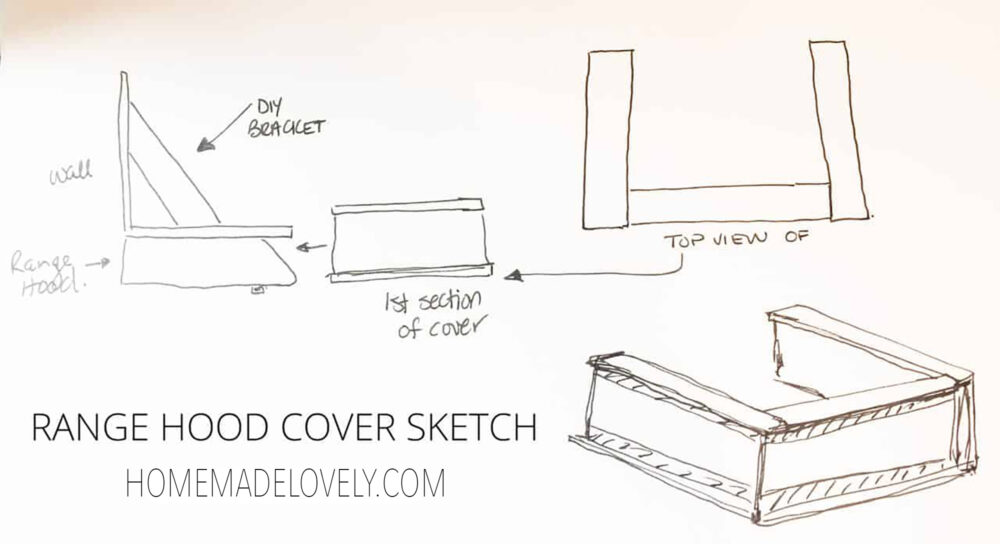
We documented every step of the process with detailed photos to make it easier for you to follow along. While every kitchen setup is unique and exact measurements will vary, the photos will help you visualize how each piece comes together. Use them as a guide alongside the instructions to customize your own range hood cover!
Materials You’ll Need
- Broan Corteo 30″ Range Hood (or similar)
- Wood: 1″x6″x5′ and pine project panel (1″x36″x60″)
- 1 length of MDF door stop
- 2 unfinished pine corbels
- 1″x3″x8′ MDF
- Wood filler
- Caulking
- Paint
Tools You’ll Need
- Brad nailer and nails
- Drill
- Screws
- Sandpaper
- Paintbrush
- Stud finder (optional)
Step-by-Step Instructions
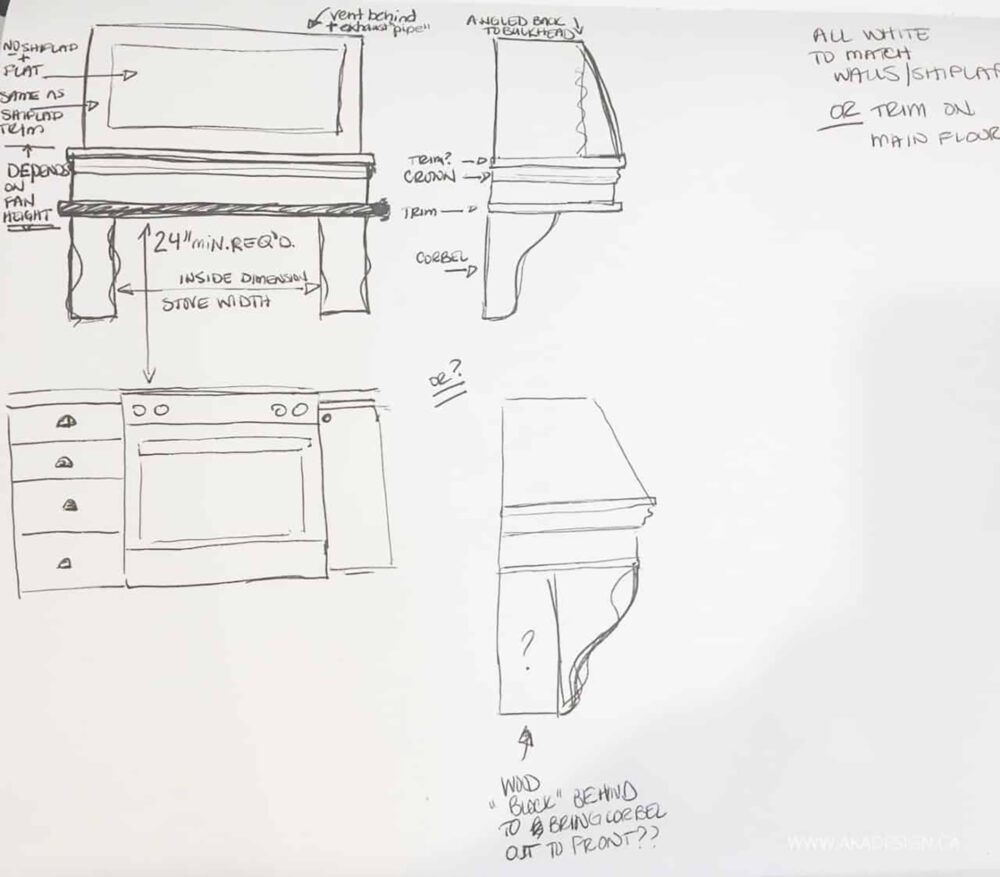
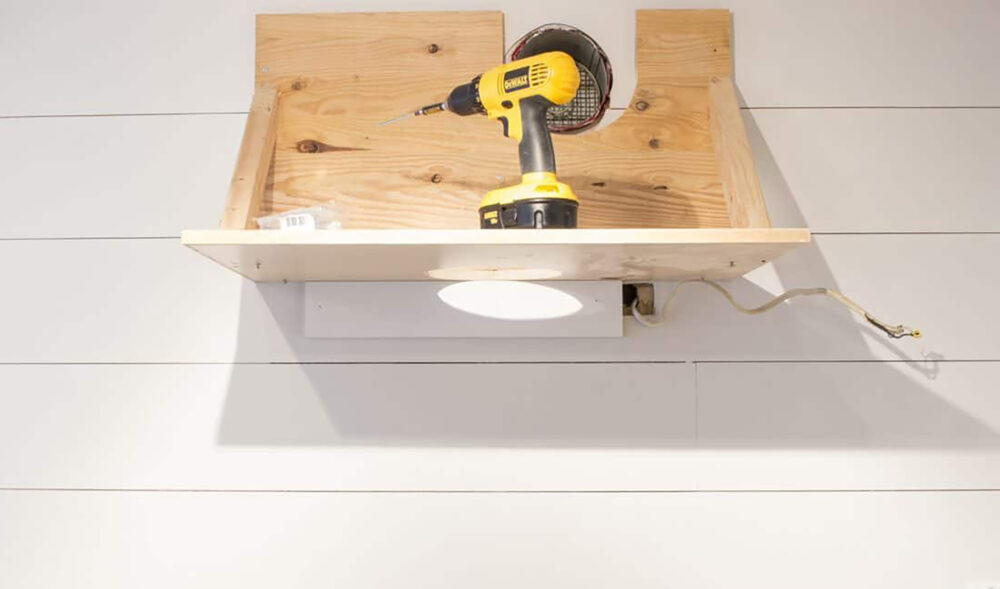
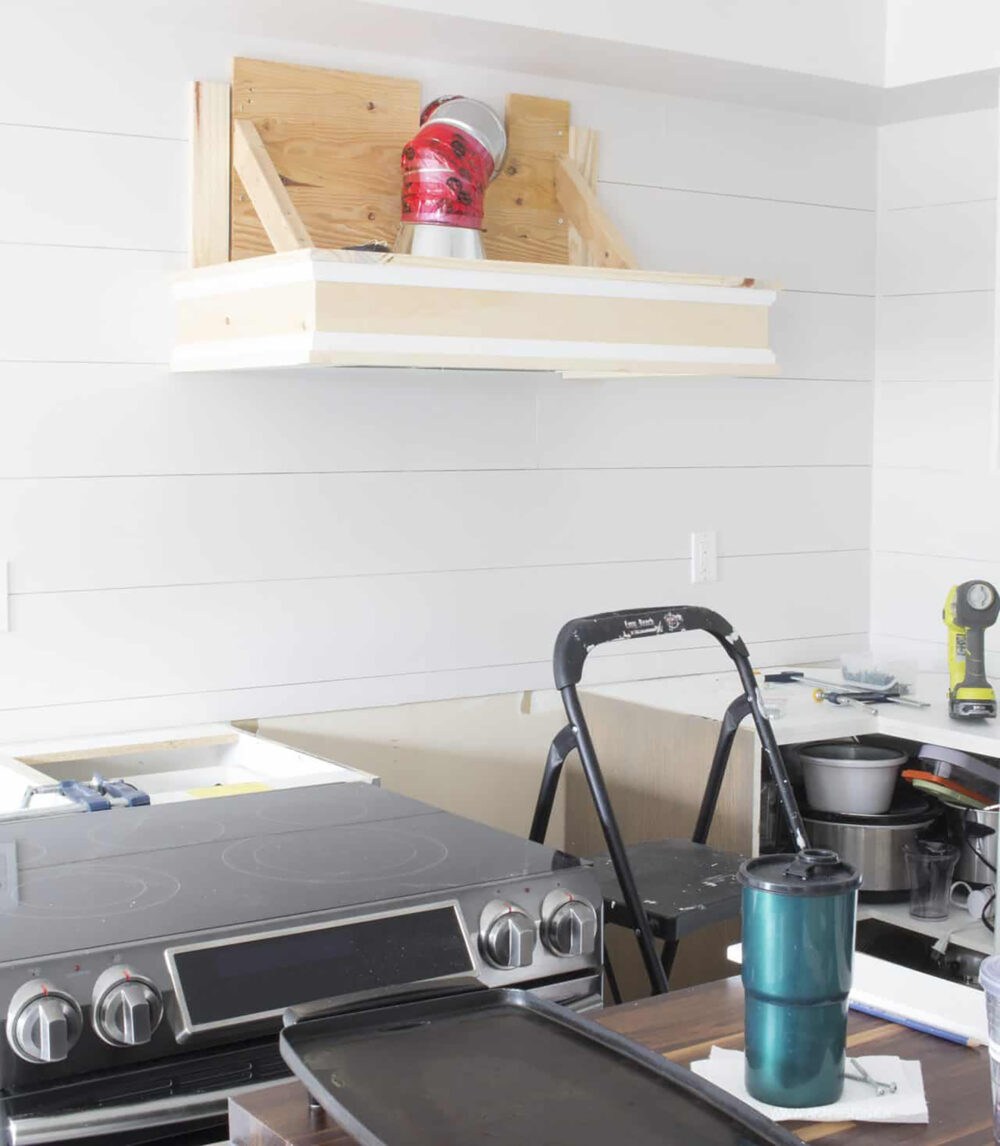
1. Build the Frame
Start by constructing a simple wooden frame with a back, bottom, and side supports. This will serve as the base for your range hood cover. If you’ve got the right-sized scrap wood, you can use that since the frame will be hidden.
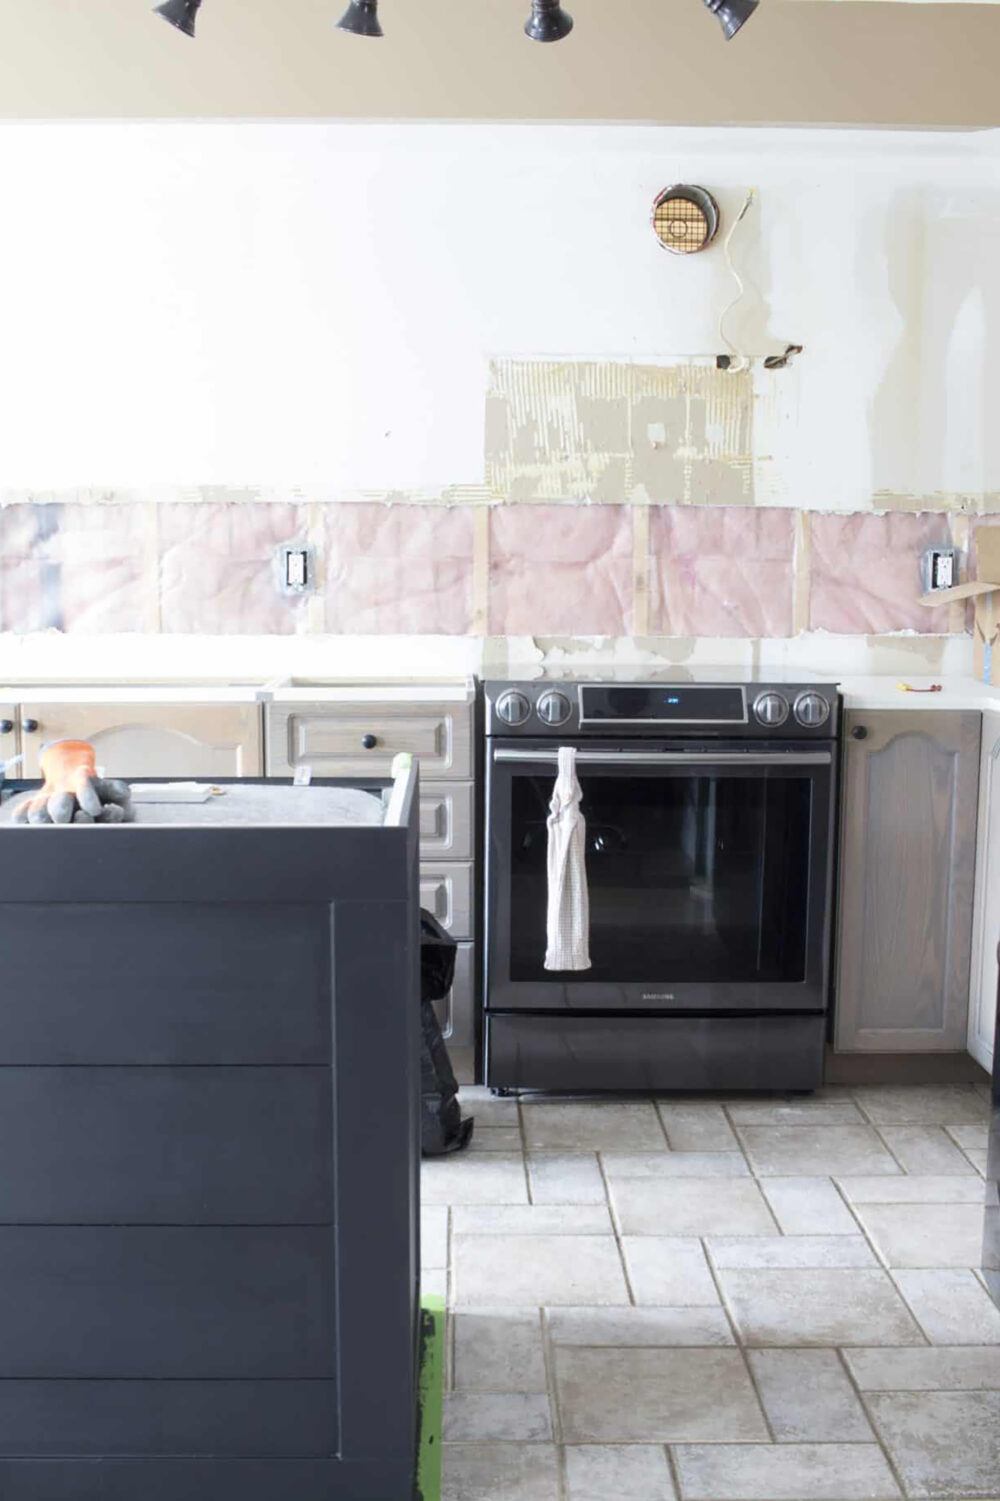
- Cutouts for Venting: Make cutouts for the vent and ductwork based on your kitchen’s layout. Refer to your range hood’s manual for specific guidelines.
- Height: Ensure the range hood fan will sit at least 24 inches above the stove once installed, per safety recommendations.
- Secure to Studs: Mount the frame securely to wall studs. If you have shiplap, you can locate the studs using nail placement as a guide.
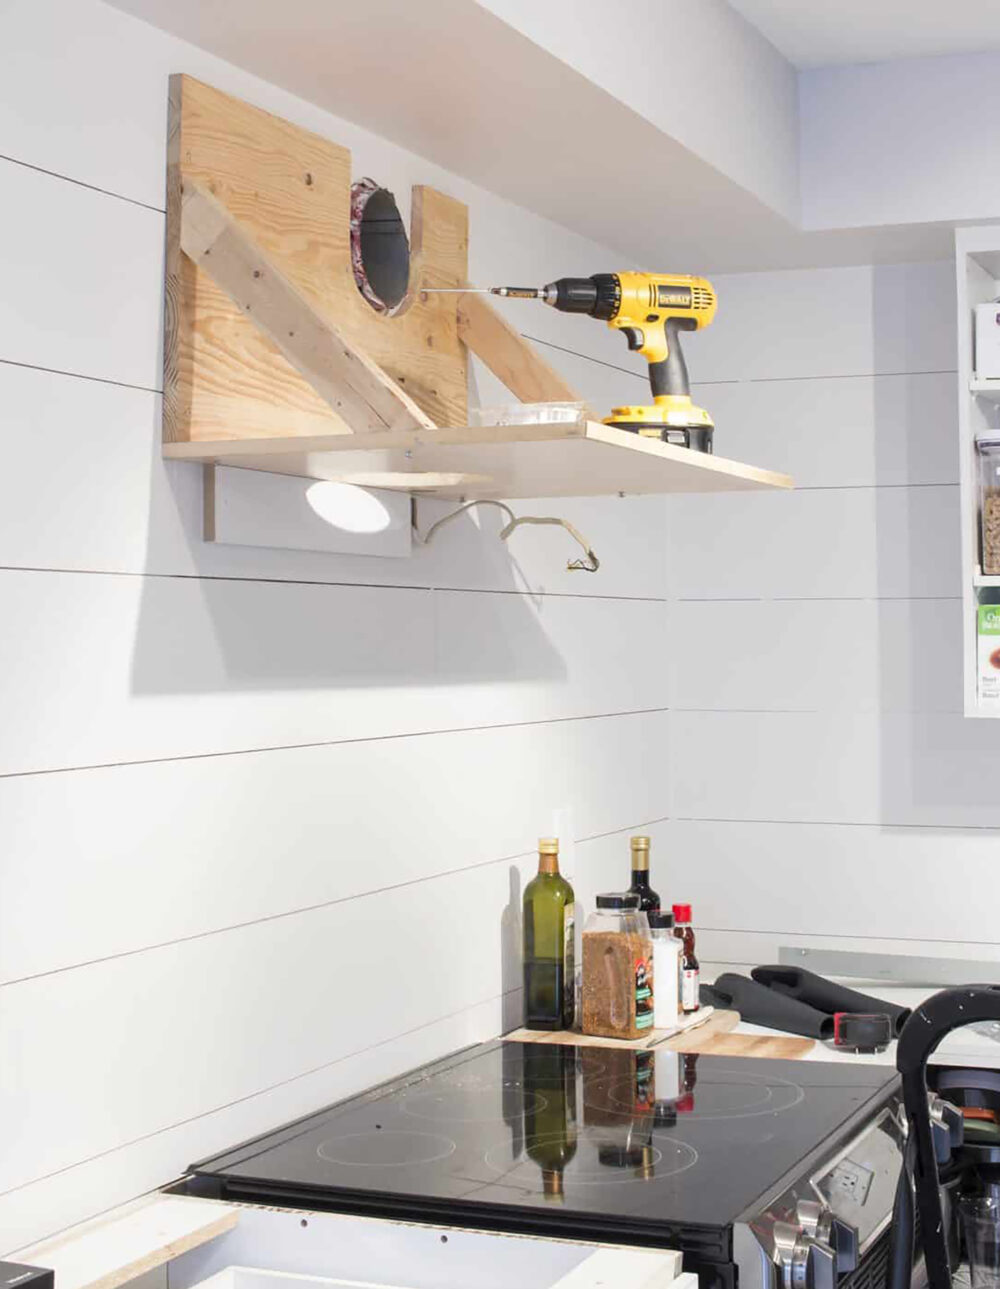
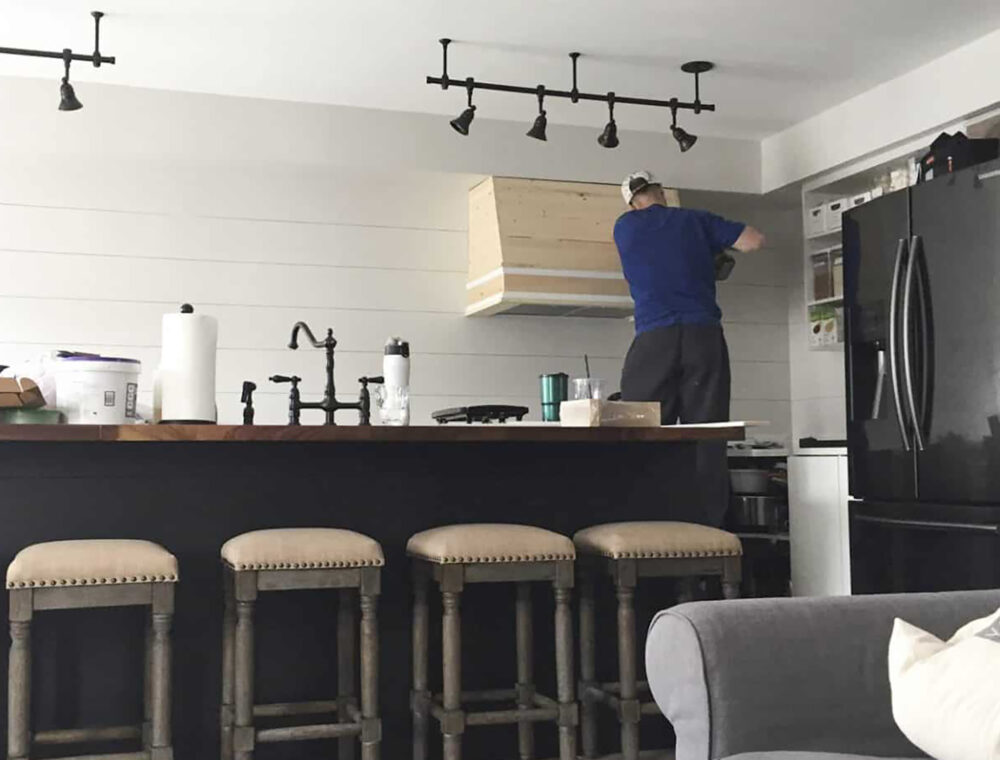
2. Attach the Range Hood
Install the range hood onto the frame following the manufacturer’s instructions. This step may vary depending on the model, but most require attaching the hood to the underside of the frame (just like you would if you were installing it under wall cabinets).
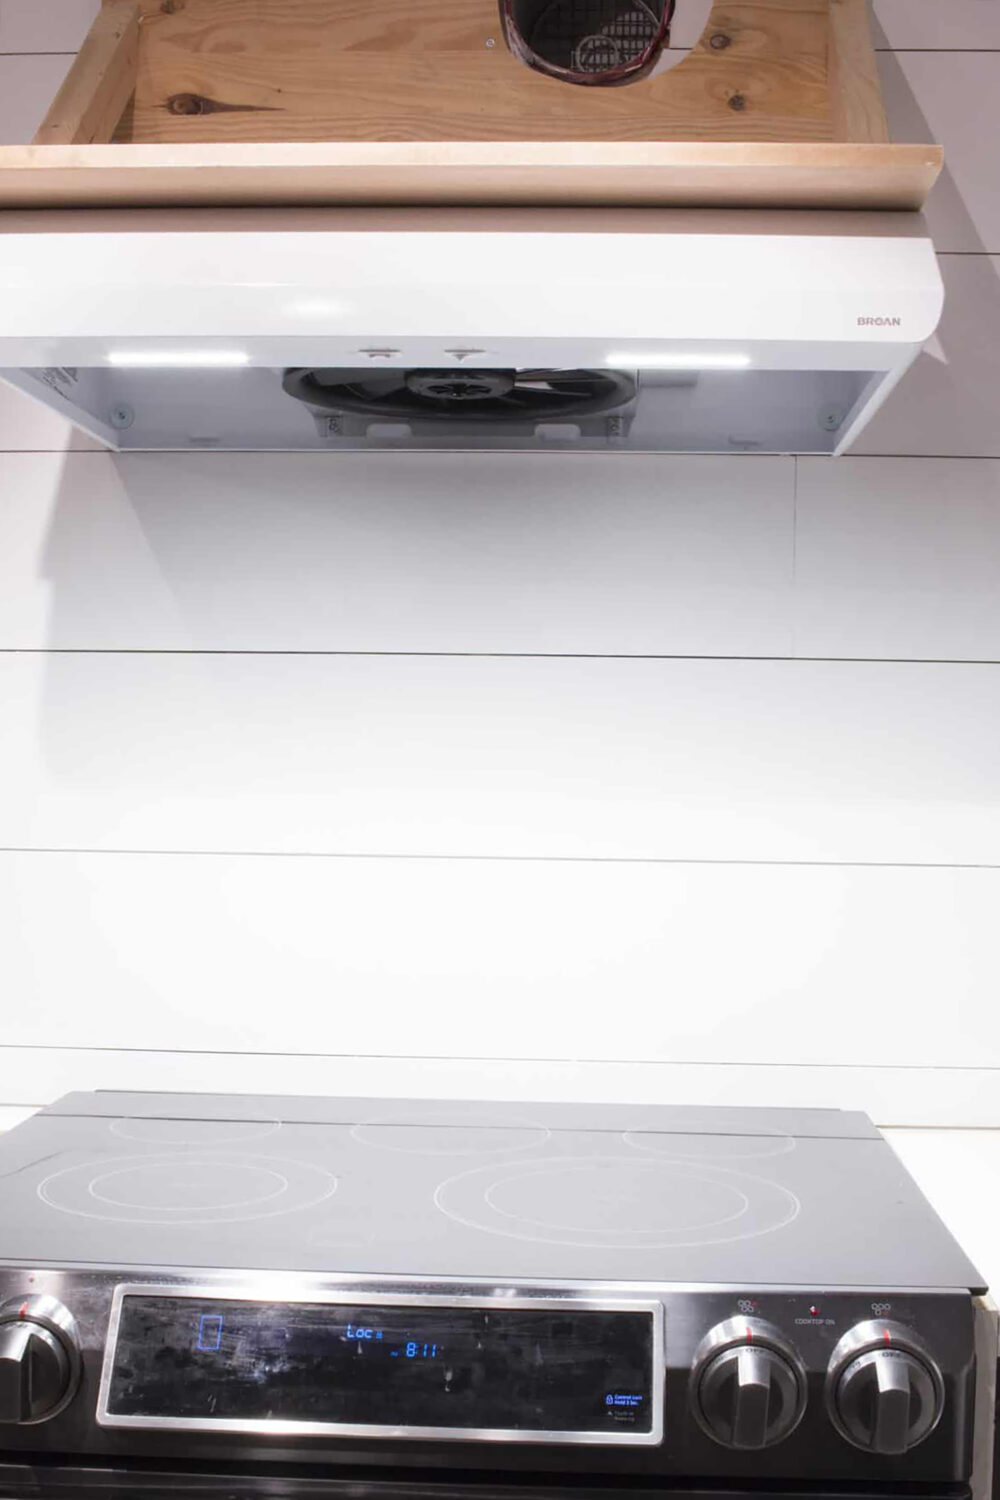
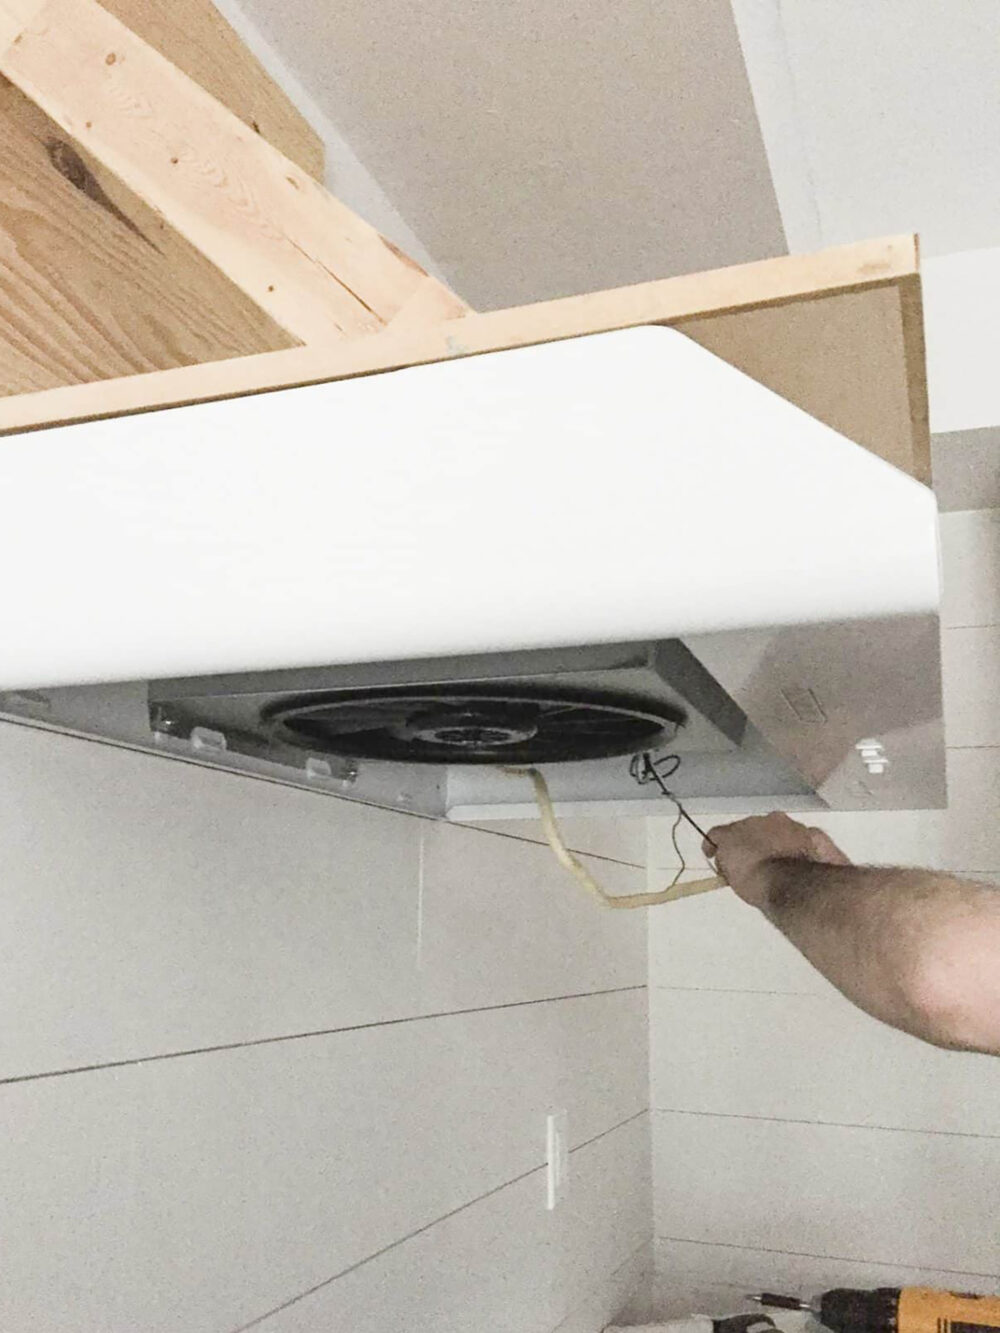
3. Connect Electrical and Ductwork
- Connect the electrical wiring for the fan and lights. If needed, hire an electrician.
- Attach the ductwork according to the range hood instructions. Use appropriate tape to seal joints, then test the fan and lights before continuing.
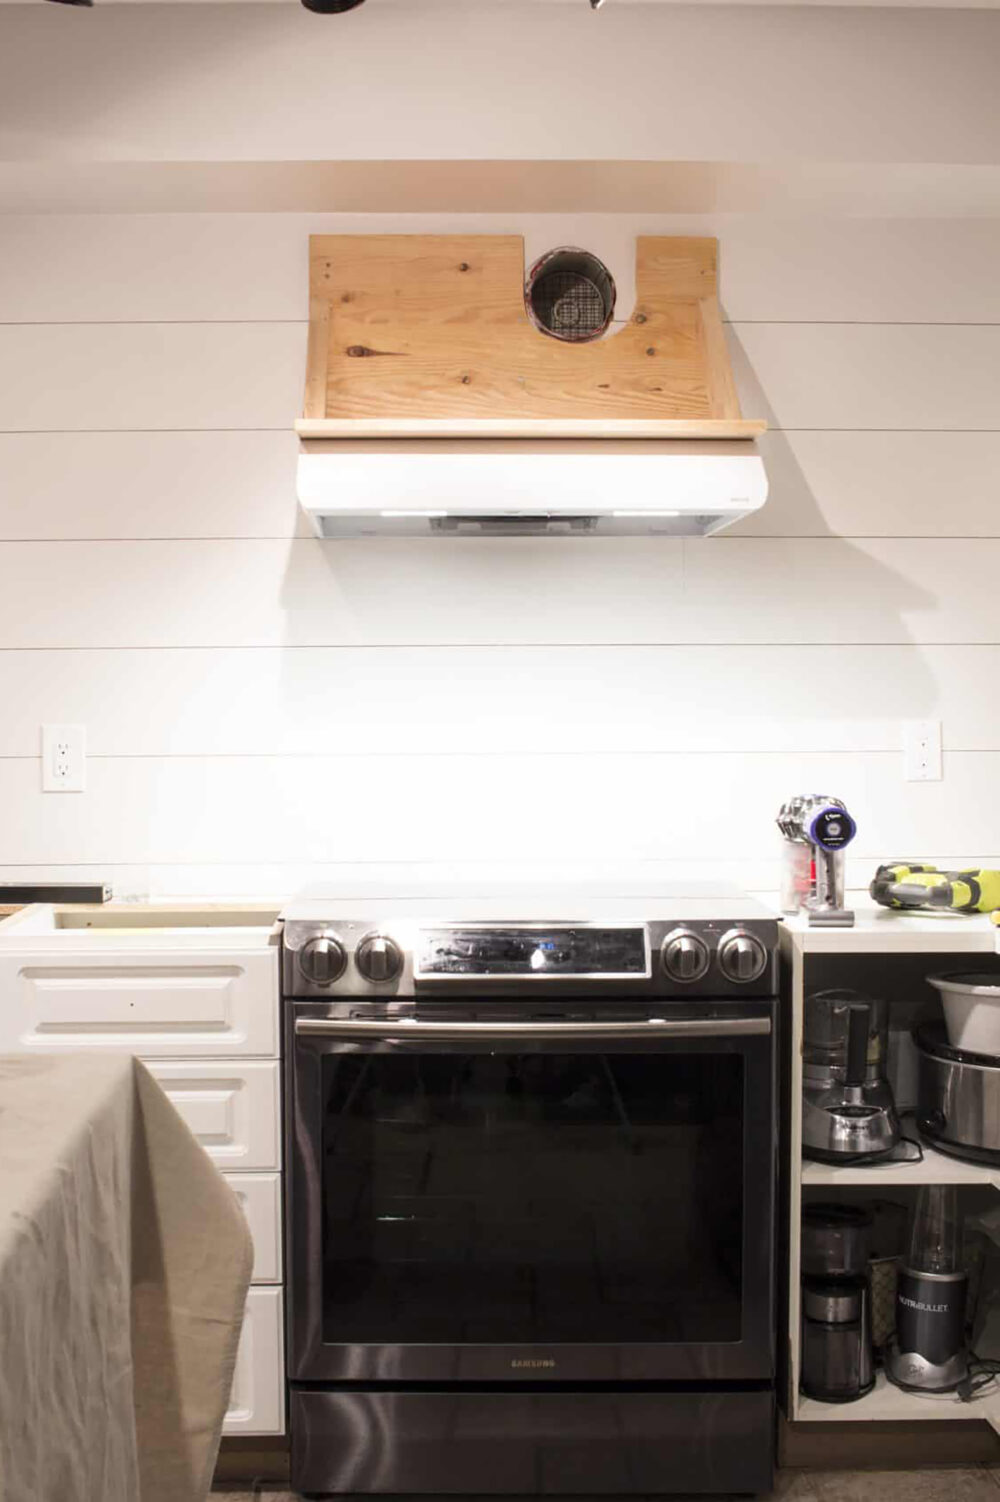
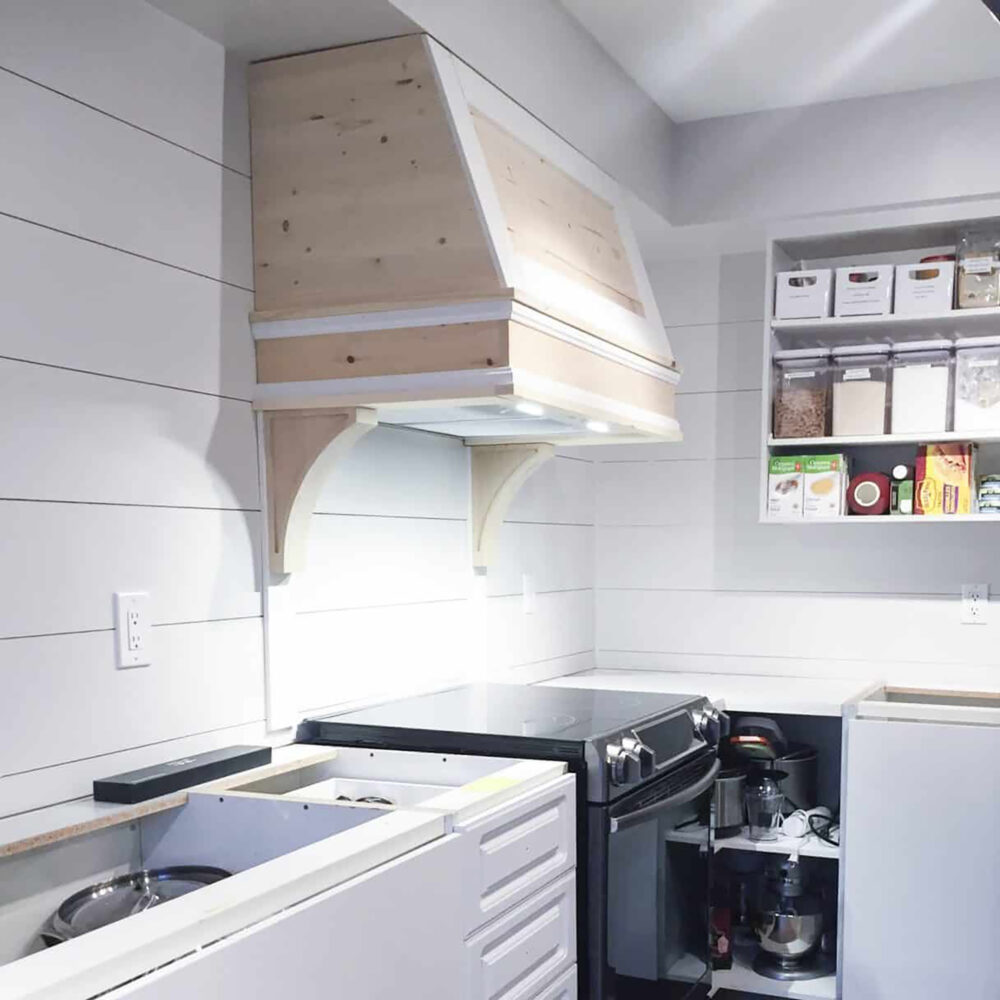
4. Build the Cover
Now for the fun part—building the cover!
- Create a basic box to slide over the frame (see the sketch and images below), using MDF and door stop for trim.
- Add a top piece, securing it with brad nails.
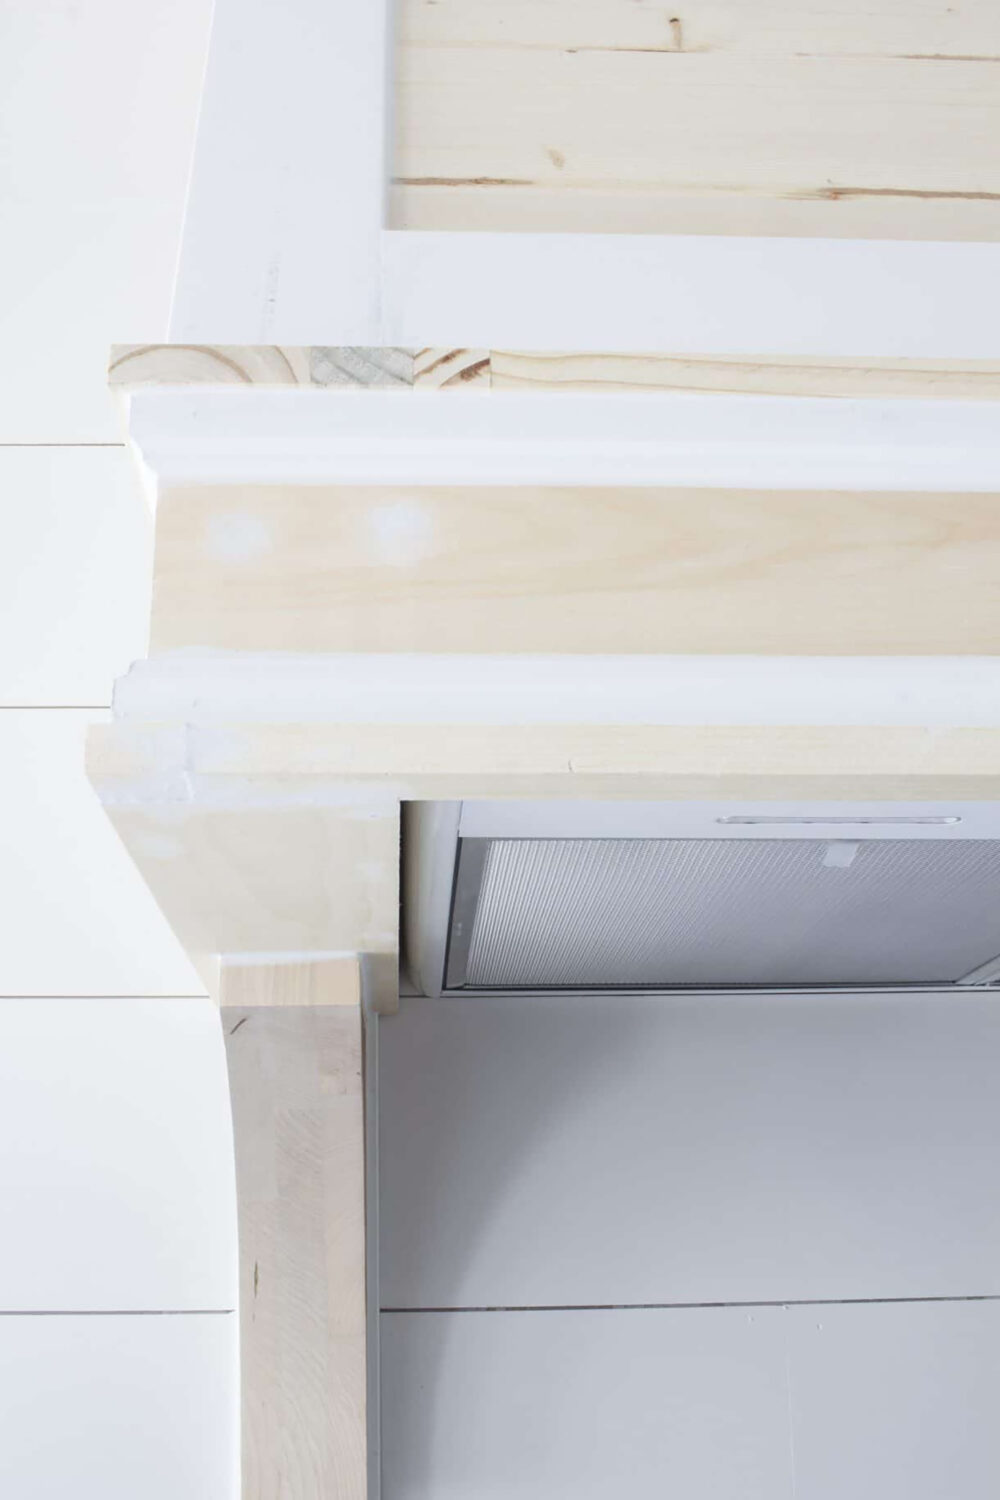
- Measure, cut, and attach an MDF frame to the front of the box for a polished look.
- Affix the corbels to the MDF, then nail them to the wall for added character.
5. Finish the Project
- Fill Holes and Sand: Use wood filler to fill nail holes, let it dry, and sand smooth.
- Caulk Joints: Caulk every seam for a seamless, professional finish.
- Paint: Apply your chosen paint color, matching the cover to your kitchen walls or trim for a cohesive look.

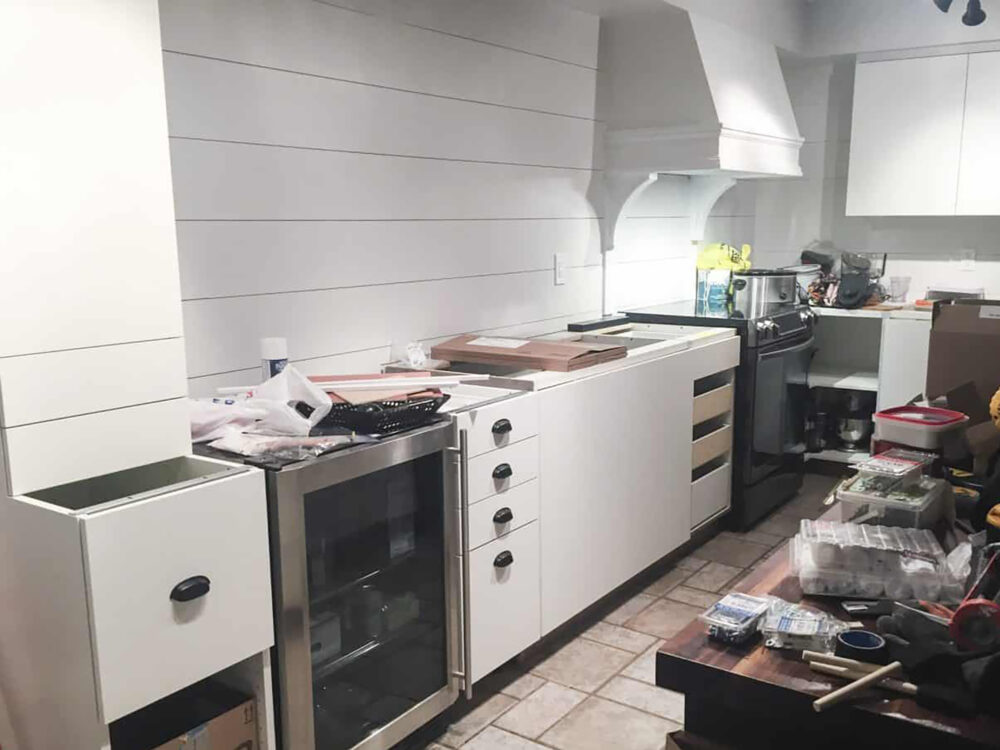
And just like that, you have a stunning custom range hood cover that will elevate your kitchen’s style!
FAQs
Absolutely! The beauty of this project is that it’s fully customizable to fit your kitchen’s dimensions and design aesthetic.
Yes, you’ll need to remove any cabinetry above your stove to make room for the range hood and custom cover.
Our vent and wiring weren’t centered either! Simply adjust the frame and cover design to accommodate your setup.
If you have basic carpentry skills or are comfortable using tools like a drill and brad nailer, you can tackle this project with ease.
More DIY Decor Projects
- Shiplap and Barn Beam Fireplace Mantel Makeover
- DIY Range Hood Cover: Easy Custom Kitchen Upgrade
- Build a Faux Mantel Shelf For YOUR House to Decorate Each Season!
- DIY Balustrade Coffee Table + Where to Get Balustrades!
- DIY Faux Floral Arrangement: Feminine Yet Rustic Crate
- How to Seal Butcher Block Counters for a Durable Finish
- DIY Farmhouse Bathroom Mirror Tutorial
- How to Make a Large Hanging DIY Chalkboard
- Walnut Butcher Block Counters: Installation and 8-Year Review

DIY Range Hood Cover Tutorial
Build a DIY range hood cover with this simple tutorial! Add custom charm and functionality to your kitchen with this step-by-step guide.
Materials
- Broan Corteo 30″ Range Hood (or similar)
- Wood: 1″x6″x5′ and pine project panel (1″x36″x60″)
- 1 length of MDF door stop
- 2 unfinished pine corbels
- 1″x3″x8′ MDF
- Wood filler
- Caulking
- Paint
Tools
- Brad nailer and nails
- Drill
- Screws
- Sandpaper
- Paintbrush
- Stud finder (optional)
Instructions
1. Build the Frame
- Construct a wooden frame with a back, bottom, and side supports.
- Make cutouts for venting and ductwork, based on your kitchen’s layout.
- Mount the frame securely to wall studs, ensuring it’s at least 24 inches above the stove as per safety guidelines.
2. Attach the Range Hood
- Install the range hood onto the frame following the manufacturer’s instructions.
3. Connect Electrical and Ductwork
- Wire the fan and lights, consulting an electrician if needed.
- Attach the ductwork using appropriate tape for sealing joints. Test the fan and lights.
4. Build the Cover
- Create a basic box from MDF to slide over the frame, trimming it with MDF door stop.
- Add the top piece and secure it with brad nails.
- Attach an MDF frame to the front and secure corbels to the wall for added detail.
5. Finish the Cover
- Fill nail holes with wood filler, sand smooth, and caulk seams for a professional look.
- Paint the cover, applying additional coats as needed for full coverage.
Notes
We documented every step of the process with detailed photos to make it easier for you to follow along. While every kitchen setup is unique and exact measurements will vary, the photos in the blog post will help you visualize how each piece comes together. Use them as a guide alongside the instructions to customize your own range hood cover!
Creating our DIY range hood cover was such a rewarding project—it’s functional, beautiful, and uniquely ours. Every time I walk into the kitchen, I’m reminded of the thought and care we put into this space, and I hope this tutorial inspires you to do the same in your home.
Have you tackled a range hood project or thought about building one? I’d love to hear your ideas or questions in the comments below!

Wow! The 2 of you together make quite a team! It looks perfect and the whole kitchen is gorgeous. Great work!
Thank you Michelle. We do make a good team – we’ve spent years working on that! 🙂
Great job! I really like your design and the finished project looks great. I really like your whole kitchen
Thanks, Lynn!
I have a white wood range hood similar to yours but it never seemed quite right- reading your blog today made me realize what’s missing: Corbels!!!
Thank you for the inspiration- I think I can add some pretty easily.
I love the ‘Eureka’ moments that your blog brings me!
Oh yes! Corbels make it so much better!
Your new range hood is beautiful. Your entire kitchen looks great. You and your husband did a wonderful job working together.
Thank you, Bonnie!
We are checking out bloggers who have made custom hoods. I’ve book marked yours . I’d love to add a seperate mini fridge and desk area to our make over . Would you mind giving the measurements of your kitchen space ?Love all the changes you made . Your kitchen truly is a DREAM KITCHEN ! GREAT JOB !!
This looks amazing!! What an awesome project! Hey – I also love the light fixtures in these pics – can you share where they came from? 🙂
Thanks!
Thank you, Claire! The light fixtures can be found via the Shop our House page here: https://homemadelovely.com/shop-our-house/
I also love your fixtures! I looked on the shop our house page, but the track lighting is different from the actual fixture in your kitchen… Could you give anymore information on where I can find your track lighting fixture!
Yes, that was to simplify. The actual track lighting we have is sold by the piece…so each light, each electricity conducting bar and each of the brackets is separate. We found them at Build.com and they’re buy Seagull lighting. But I’d highly recommend asking the Build.com staff via the chat or by email how to put your own together. They’ll tell you how many of each thing you’ll need. I hope that helps!
Love the look, where did you get the track lighting over the stove?
Hi Kathy. We bought it from Build.com. It’s made by Seagull lighting. I don’t see it in the same color we have available right now though.
LOVE! Beautiful kitchen and a fantastic job on the range-hood. So glad I found your post on the link party. Happy Summer, Kippi
Thank you! It’s one of my favorite parts of the kitchen makeover!
Congratulations on being featured!
Fantastic project. Happy Summer, Kippi
Absolutely beautiful! I renovated my kitchen last summer, your whole post really spoke to me, I had to decide on something I loved and could live with for a long time… and I often have to help clients make the decisions as well. Plus, I also built my own range hood (I think with the same basic hood!)… Leaving lights on at night is something I wanted to be able to do also, what we have done is in our kitchen, bathrooms and hallways installed new outlets that have built in LED night lights! No fumbling or forgetting to turn the light on before locking up. (just in case you want to see… http://domesticdeadline.com/2017/08/07/kitchen-renovation-electrical-outlets/). Thanks for linking up to #HomeMattersParty
Oh my goodness! This is beautiful! Your whole kitchen is wonderful. I’ll be showing this to my husband asap. He’s pretty handy and hopefully he can do something like this in our kitchen. Thanks so much for sharing!
Hi Shelly, Thank you so very much. 🙂 Have fun with your kitchen! 🙂 Let us know if you have any questions!
Hi, it looks like you put in a different backsplash behind the stove. Can you tell me what you useD and why you did not keep the ship lap there? Thanks!
Hi there,
Yes, we installed peel and stick subway tile behind the stove. Because the shiplap backsplash is plywood, I was concerned about two things near the stove: 1. how wipeable HOT things would be and 2. how flammable the wood would be. I also kinda like the visual difference in similar white colors but different shapes, if that makes sense.
Sorry…I love the hood but where did you find the track lights!
Lol. That’s okay! I’m glad you like the hood and yes, many others like the track lights too. Unfortunately, they’ve been discontinued. I believe because they were too difficult for consumers to order and put together…every single piece was a separate item. The rods, the bars, the light themselves. It was hard to plan and buy accordingly, and we had help and still had to order additional parts. I think they could have fixed it by creating better directions and such, but they pulled the product instead. 🙁 Which is a total shame because they’re beautiful and a great solution to situations like ours where the actual ceiling light boxes were in an awkward place. I’m so sorry!
What a shame, as my electrical boxes are in an awkward place also. But I appreciate your quick reply. Thank you!
I know! It really is! There are track lights at Home Depot and Lowe’s etc that have adjustable rails and individual lights to go on the tracks too. They’re not quite as pretty, at least not ones I’ve found. But they would work for the odd box placement. 🙂
Hi, I see its a couple years since the kitchen and hood fan was done, still loving it?
Just wondering how difficult it would be to replace or repair the fan since the frame is built around it. I did white subway tile in our kitchen with acacia wood counter tops. Turned out very nice.
Hi there,
We are still loving it after four years! It needs a bit of touch-up paint because a knot in the wood is bleeding through a bit. But otherwise, it’s great! So far we haven’t had to replace or repair the fan and the lights are LED. the filters on the bottom side come off and you can access some of the fan and the mounting screws for our particular fan there. So for us, it’s not a problem. As with any DIY, you’d have to assess for your particular situation and space. 🙂