Have you ever stood back and wished your foundation could just disappear? I know I have. When we first bought our bungalow, the cinder block foundation was not exactly the “welcome home” vibe I dreamed of. Between the peeling paint and rough concrete texture, I couldn’t wait to give it a fresh new face.

And if you’re tackling other outdoor projects, you might enjoy reading my post on An Easy Solution to Peeling Outdoor Paint for even more curb appeal inspiration. These small updates can make such a big impact!
How to Reface a Cinder Block Foundation
Materials
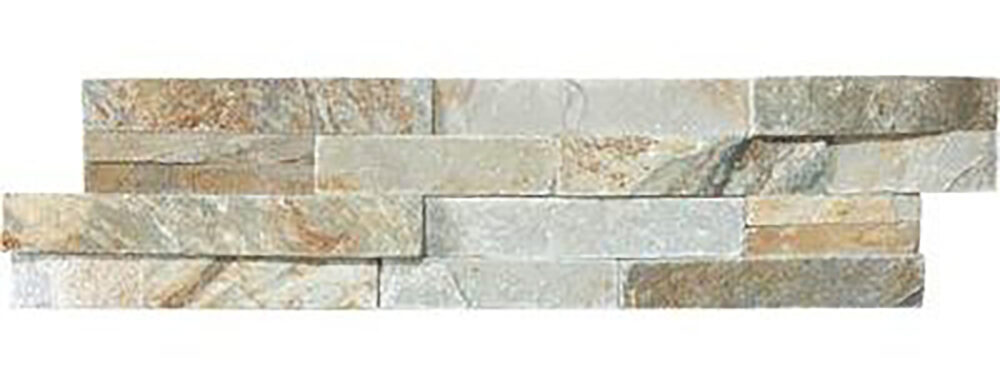
- Sassi 6″x24″ Ledgestone (your chosen color, enough for your space)
- Construction adhesive
- Exterior masonry sealant
- 2x4s and random wood for makeshift supports
Tools
- Putty knife or scraper
- Drill with wire brush attachment
- Broom
- Three-foot level
- Angle grinder with diamond blade
- Small bench and clamps
- Safety glasses and gloves
Instructions
1. Prep the Foundation
Start by removing any loose paint from the cinder block foundation. Use a scraper or a drill with a wire brush attachment to get rid of chipping and peeling paint. You don’t need to strip all the paint—just ensure the surface is smooth enough for the adhesive to stick. Sweep away any debris with a broom.

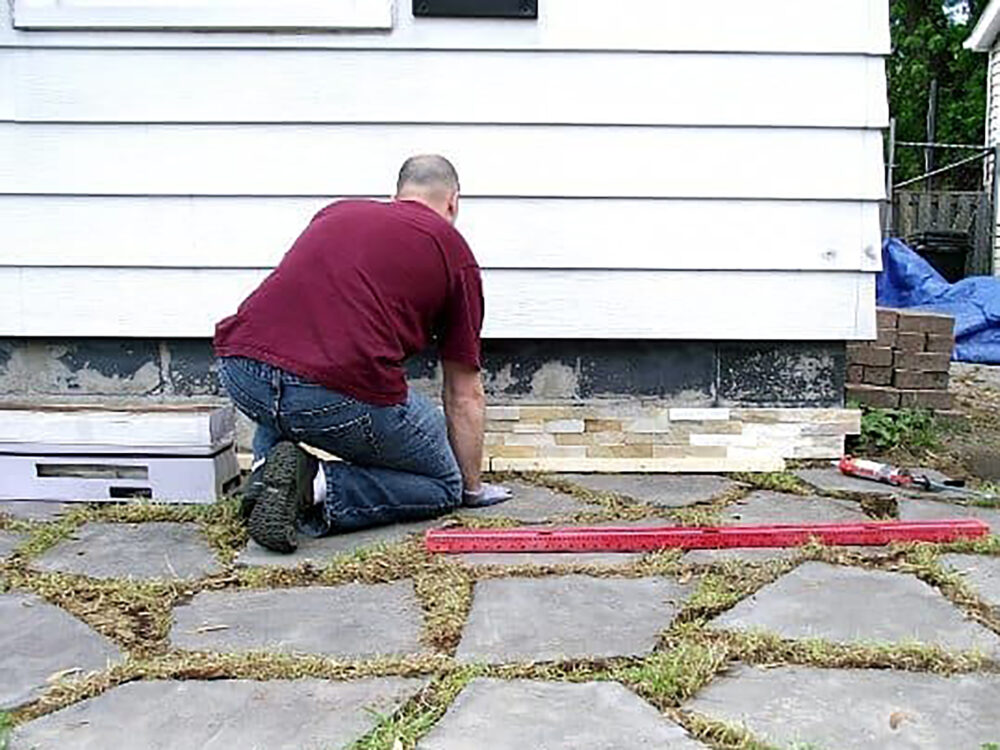
2. Create a Level Base
Using a three-foot level, line the bottom of the foundation with 2x4s. These will act as a temporary support to keep the Ledgestone pieces aligned and prevent slipping while the adhesive dries. Adjust the boards as needed, propping them up with extra wood or stones to ensure they’re perfectly level.

3. Apply the Adhesive
Apply construction adhesive to the back of a Ledgestone panel in a squiggly pattern. Be careful not to overdo it—the adhesive is very strong, and a little goes a long way.

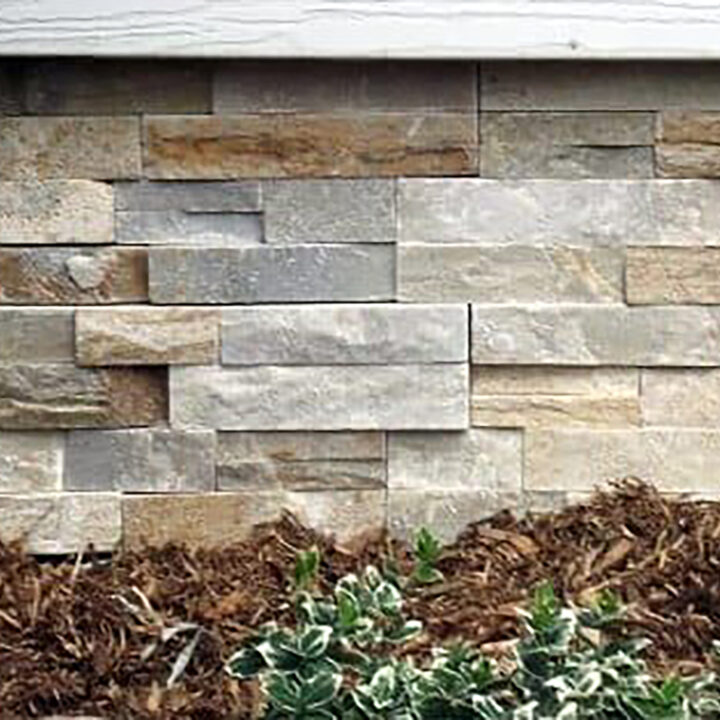
4. Install Full Sheets of Ledgestone
Begin at one end of the foundation and press the first panel of Ledgestone firmly against the wall. Continue adding panels side by side, ensuring they are level and snugly fit together. Don’t worry if some pieces extend past the edges of the foundation; these will be trimmed later.
5. Measure and Cut for Smaller Spaces
When you reach areas where full panels won’t fit, measure the gaps carefully. Use an angle grinder with a diamond blade to cut the Ledgestone to size. For safety, clamp the panels securely to a bench while cutting. Once cut, apply adhesive to the back of the pieces and fit them into the gaps.


6. Trim Excess Pieces
After all panels are in place and the adhesive has dried thoroughly (check the package instructions for drying times), use the angle grinder to trim any overhanging pieces at the corners.
7. Seal the Foundation
Finally, apply an exterior masonry sealant over the entire surface. This step is crucial for protecting the Ledgestone from weather damage and ensuring it stays looking beautiful for years to come.
A Few Tips to Keep in Mind
- Always wear safety glasses and gloves when cutting Ledgestone.
- Consider purchasing corner pieces of Ledgestone for a polished, professional look.
- Ask your local hardware store for advice on the best adhesive and sealant for your specific climate.

FAQs
The prep and installation can be completed in a weekend, but you’ll need to allow time for the adhesive and sealant to cure according to the manufacturer’s instructions.
Yes, as long as you remove any loose paint and debris beforehand. Smooth, clean surfaces will ensure the adhesive sticks properly.
Absolutely! It’s designed for exterior use and holds up well in various weather conditions when sealed correctly.
An angle grinder with a diamond blade is ideal. This tool makes precise cuts and handles the material’s hardness effectively.
Cinder Block Foundation Refacing Tutorial
Transform an ugly cinder block foundation with this budget-friendly DIY ledgestone refacing tutorial. Step-by-step instructions included!
Materials
- Sassi 6″x24″ Ledgestone
- Construction adhesive
- Exterior masonry sealant
- 2x4s and scrap wood
Tools
- Putty knife or scraper
- Drill with wire brush attachment
- Broom
- Three-foot level
- Angle grinder with diamond blade
- Small bench and clamps
- Safety glasses and gloves
Instructions
- Prep the Foundation:
Remove loose paint with a scraper or drill with a wire brush attachment. Sweep the surface clean. - Create a Level Base:
Line the base of the foundation with 2x4s, leveling them with extra wood or stones. These will support the Ledgestone during installation. - Apply Adhesive:
Spread construction adhesive on the back of each Ledgestone panel in a squiggly pattern. Avoid using too much adhesive. - Install Full Panels:
Starting at one end, press the panels firmly against the foundation. Continue side by side, ensuring they stay level and aligned. - Cut and Fill Gaps:
Measure small gaps, then cut Ledgestone panels to size using an angle grinder. Securely clamp panels while cutting for safety. - Trim and Finish:
Once the adhesive dries, use the grinder to trim overhanging pieces at corners. - Seal the Foundation:
Apply a masonry sealant to protect the Ledgestone from weather damage.
Notes
- Wear safety glasses when cutting Ledgestone.
- Purchase corner pieces for a more professional look.
- Consult your hardware store about the best adhesive and sealer for your climate.
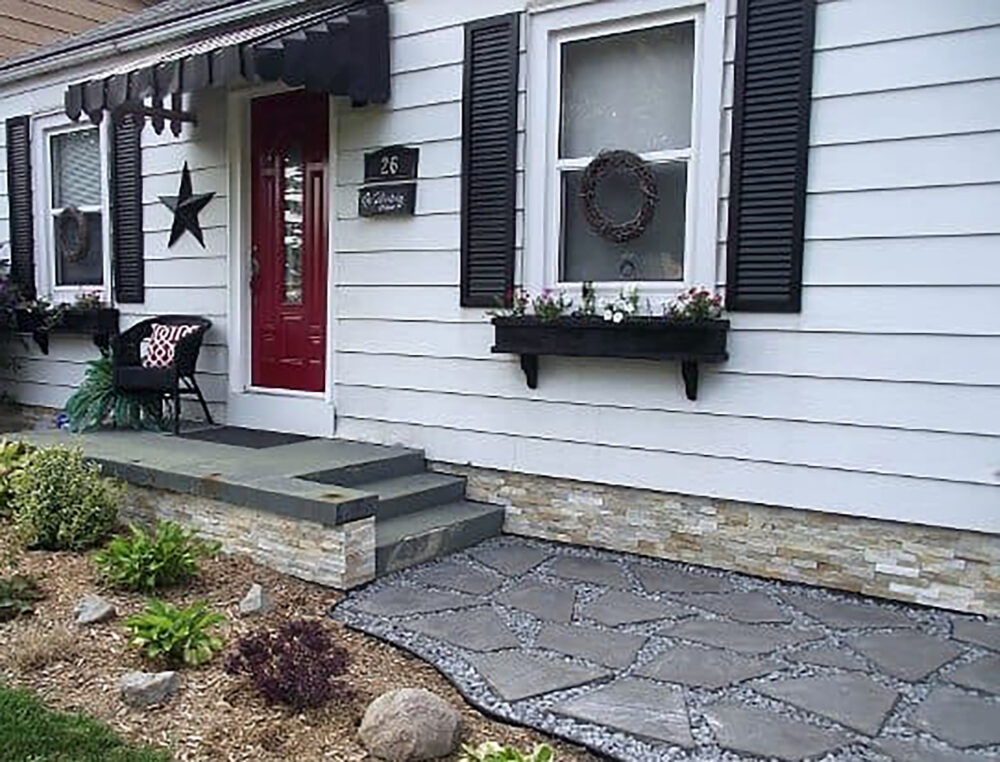
Refacing our foundation was a game changer for our home’s curb appeal. What once was peeling and unsightly is now polished and inviting—and it didn’t break the bank! If you’re looking to transform your own foundation, this project might just be the solution you’ve been searching for.
Have questions or want to share your experience with a similar project? Drop me a comment below—I’d love to hear from you!

I’ve been waiting for this tute since the teaser! It looks awesome (and fairly accessible). One question – in the HD link, I didn’t see any exterior rating for the tiles. Are they sealed in anyway?
They are not sealed…that’s why step 8 is to apply an appropriate sealer! 🙂
Could this product be used to reface a brick fireplace? Your foundation looks fantastic! Well done! I’m sure the new owner appreciates all your hard work.
It could totally be used on a fireplace! We are thinking of using it on an interior wall with a gel fireplace at this house.
Thank You for the beautiful idea. I have been looking for ways to add curb appeal to our new house (well, new to us).
Hope you can use it – it makes it look newer!
Did you go all the way around the house?
I’d love to say yes and had we not sold the house and moved we may have. But time and weather were not on our side when we were working on the project!
That’s great. What if you have rock faced concrete blocks, not smooth?
What color did you use?
I’m sorry – what color of what? The Ledgestone? We used what is now called Costa.
This is really helpful! Thank you for writing this post!
I am confused… (which is NOT uncommon) It says on here to when you get to the corner and have no more room to use the full sheets, You cut them first then use a grinder after they are glued to the cement wall. Is there a way to get them precut perfectly so you (or me) do not have to do this step at all? Or will someone else be able to cut them?
Oh btw I think it looks fantastic!!!
I really love the foundation veneer idea with the stone stacking. It looks really great and can cover ugly concrete underneath.