One of my favorite things about Christmas is creating DIY projects that I can use year after year, adding a touch of warmth and charm to our home. A few years ago, The Home Depot challenged my husband, Dean, and me to come up with a holiday project that featured their Martha Stewart LED string lights, and I was all in. The challenge quickly became an opportunity to design a festive wooden crate filled with birch logs, lush greenery, and sparkling lights. This project turned out to be something I love bringing out each holiday season, and I’m excited to share it with you!
Our original plan was to create something for the porch, but once we realized we were working with indoor lights, we adjusted our thinking and turned our focus to a cozy indoor decoration. I wanted to design something practical—something that you could recreate and use in your own home, season after season. So, with a bit of creativity (and some raw lumber from Home Depot), we built this wooden crate that’s perfect for adding a festive touch to any room.

Before we dive into the details of creating your own wooden crate, if you’re looking for more tips to elevate your Christmas decor this season, be sure to check out my post on How to Decorate for Christmas: My Tips for a Cozy, Festive Home. It’s filled with ideas that will help bring warmth and style to your space, making it the perfect backdrop for your new festive DIY project. Whether you’re decorating your home for the first time or just looking for fresh ideas, this guide will give you all the inspiration you need to create a home that feels both cozy and festive for the holidays.
DIY Wooden Crate with Logs, Greenery and Lights

Supplies
- wooden crate*
- Varathane Ultimate Wood Stain in Sun Bleached
- Minwax Stain in Dark Walnut
- foam brushes
- lint free rag
- cup pull handles (optional)
- Martha Stewart LED String Lights x2
- birch logs
- burlap
- real and faux greenery assortment

Instructions
1. If you have to build a crate you can follow our rough instructions:
*Essentially Dean cut six pieces of 1″ by 3″ into 16″ lengths for the sides and two 1″ by 10″ pieces to approximately 10″ tall for the ends (with appropriate holes drilled for the cup pull handles) and a 1″ by 10″ piece to 16″ long for the bottom. He used his Ryobi Brad Nailer to attach it all together.
2. Before staining your crate, first give it a light sanding to remove any really rough edges. Then cover completely in Varathane Sun Bleached stain using a foam brush. Wipe of excess with a rag. Let dry completely. Then apply a coat of Minwax Dark Walnut over the Sun Bleached stain. Wipe off excess and let dry completely.
For a step-by-step tutorial on how to stain wood, check out this post.
3. Attach handles to the crate if using.
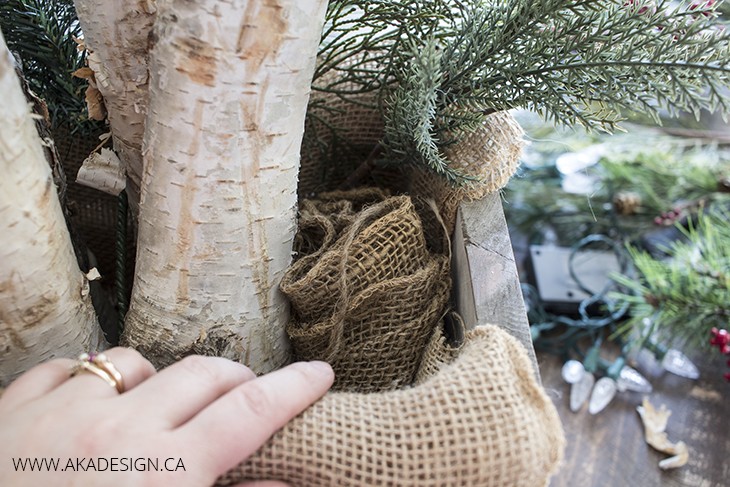
4. Place a layer of burlap into the crate. This will help everything to stay steady and hide any of the ugly greenery ends and light battery boxes from view through the gaps in the crate.
5. Stand birch logs on end in center of crate. Use additional burlap between and around logs to help with placement and balance.

6. Begin to fill in the space behind, between and around logs with greenery. I used a mixture of faux greenery and then tucked in a few sprigs of real cedar from our yard to give some variety and a natural scent – without an overload of sap!
7. Tuck the string lights in and around the logs and greenery. Then turn on and hide the battery packs in the crate.


8. Adjust any logs you need to adjust and then you’re done!

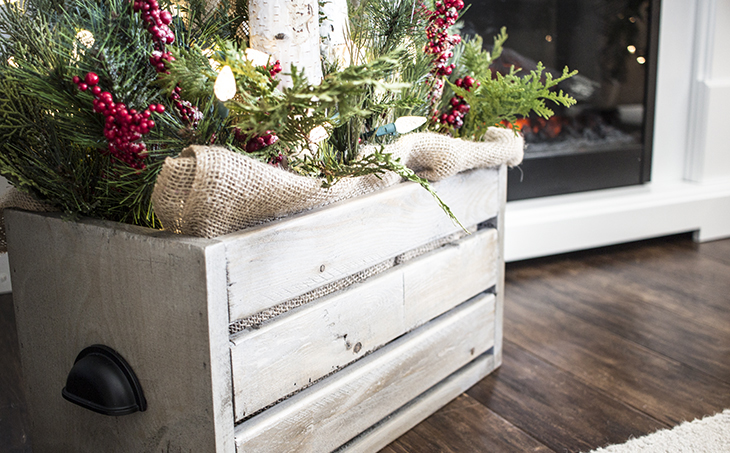
Where to Display Your Christmas Crate
This project is so versatile! Whether as a centerpiece on your dining table, a festive addition to your fireplace mantel, or a welcoming decoration for the front porch, it’s sure to add holiday cheer. Wherever you place it, the lights will twinkle, the greenery will bring the scent of Christmas into your home, and the logs will evoke cozy, wintery vibes.

FAQs
Building the crate itself can take a few hours, depending on your experience with woodwork. Staining the wood and letting it dry takes some time too, but the rest of the decorating comes together in an afternoon. It’s a fun, manageable project that you can complete over a weekend!
Of course! The mixture of faux and real greenery is just a personal touch, but you can create this project entirely with faux greenery if you prefer. Just make sure the greenery is full enough to fill the crate for that lush, festive look.
I tucked the lights into the logs and greenery, using the natural structure to keep them in place. The battery packs are hidden in the bottom of the crate, so make sure to tuck them out of sight under some burlap or greenery.
More Winter & Christmas Crafts & DIYS

How to Make a Wooden Crate with Logs, Greenery and Lights
Materials
- wooden crate*
- Varathane Ultimate Wood Stain in Sun Bleached
- Minwax Stain in Dark Walnut
- foam brushes
- lint free rag
- cup pull handles (optional)
- Martha Stewart LED String Lights x2
- birch logs
- burlap
- real and faux greenery assortment
Instructions
- *If you have to build a crate you can follow our rough instructions: Essentially Dean cut six pieces of 1″ by 3″ into 16″ lengths for the sides and two 1″ by 10″ pieces to approximately 10″ tall for the ends (with appropriate holes drilled for the cup pull handles) and a 1″ by 10″ piece to 16″ long for the bottom. He used his Ryobi Brad Nailer to attach it all together.
- Before staining your crate, first give it a light sanding to remove any really rough edges. Then cover completely in Varathane Sun Bleached stain using a foam brush. Wipe of excess with a rag. Let dry completely. Then apply a coat of Minwax Dark Walnut over the Sun Bleached stain. Wipe off excess and let dry completely.
- Attach handles to the crate if using.
- Place a layer of burlap into the crate. This will help everything to stay steady and hide any of the ugly greenery ends and light battery boxes from view through the gaps in the crate.
- Stand birch logs on end in center of crate. Use additional burlap between and around logs to help with placement and balance.
- Begin to fill in the space behind, between and around logs with greenery. I used a mixture of faux greenery and then tucked in a few sprigs of real cedar from our yard to give some variety and a natural scent – without an overload of sap!
- Tuck the string lights in and around the logs and greenery. Then turn on and hide the battery packs in the crate.
- Adjust any logs you need to adjust and then you’re done!
I hope this DIY project brings as much joy to your home as it does to mine! It’s such a cozy, festive way to bring a little extra sparkle and warmth into your Christmas decorating this season. Happy crafting!
Have you begun decorating for Christmas yet? Let me know in the comments below!

Want to see more content like this in your Google searches?
This button tells Google that Home Made Lovely is a source you like, so it can show you more of it.