This post contains affiliate links & photos. See our full disclosure here.
In this post: How to install baseboards in your home using butt, scarf, miter and cope joints. Plus, how to caulk your baseboards (and anything else you need to caulk like bathtubs and sinks, etc.).
In a recent post we showed you how to remove baseboards without damaging them (or the walls) and now we’re going to show you how to install them. Plus, we’re going to show you how to easily caulk baseboards and other things!
Common Questions About Installing Baseboards
How much does it cost to install baseboards? What is the price of baseboards per linear foot?
The price of installing baseboards can vary widely, depending on your location and the type of baseboard you choose.
MDF or fiberboard baseboards will cost less than solid wood baseboards, like those made from pine or oak. MDF baseboards will cost anywhere from $0.80 a foot to $4 a foot, while solid wood baseboards cost from $2 a foot to $6 a foot or more.
Installation costs also range in price as contractors may charge based on the number of cuts needed, the size of house or how many hours the job will take.
Should I buy MDF or wood baseboards?
Each type of baseboard has its pros and cons.
Wood is a more expensive but also a more durable option for baseboards.
MDF is definitely cheaper and may be a good option if you have a lot of baseboard to install. However, it is also prone to water damage – a lot of ours is damaged on the bottom edge because one of our home’s previous owners used a steam cleaner on the floor all the time and damaged it – so using MDF in bathrooms, laundry rooms or other damp areas may not be the best idea.
MDF is also softer and more prone to dings and scratches than solid wood is.
Do you need to caulk baseboards?
The answer to this is yes and no.
You most definitely do need to caulk the top of baseboards, where they meet the wall with paintable caulking. This creates a lovely finish that can make a huge difference in the look and feel of your space.
But you should NOT caulk the bottom of your baseboards where they meet the floor!
Should I caulk baseboards before I paint?
Yes, caulking the top of the baseboard before painting a wall is a good idea. Otherwise you will notice your caulking more than you may like!
Cut in with a good brush to get a nice, crisp line between your wall paint and your baseboard paint.
How do you fill gaps in baseboard trim?
The product you use to fill in gaps in baseboard trim depends on the type of baseboard you have.
If you have MDF baseboards, use a product like DAP DryDex Spackling.
If you have wood baseboards, use wood filler.
How to you attach baseboard trim?
There are a few methods you can use for attaching baseboard trim.
You can use an adhesive, but we don’t recommend this method as it’s unnecessary and can cause issues removing baseboards later.
You can use finishing nails and a hammer, and then a setting tool to set the nails into the baseboard (so they don’t stick out).
Or, you can use a brad/power nailer. This is the easiest and fastest way to install baseboards, and it helps prevent damage often caused by the hammer missing the nail using the hand nailing method!
Do you need to nail baseboard into studs?
Contrary to popular belief, no, you do not need to nail baseboard into studs.
Walls should have a horizontal piece of wood spanning their length (called a bottom plate), to which the studs are attached.
Since baseboards are attached at the bottom of a wall, they should be held in place well enough because they’re nailed to this bottom plate.
The only exception to this is if you are install very tall baseboards and want to be sure the tops are well secured to the wall. In this case, you should use a stud finder and a pencil to mark the studs along the wall. Then be sure to attach the baseboards to at least some of the studs as well as the bottom plate.
What nails do you use for baseboards?
If you’re going to attach your baseboards to the walls using nails, you will need to use finishing or trim nails.
To choose the right size nails, add the thickness of your baseboard to the thickness of drywall (usually 1/2 an inch) plus another 1/2 inch to firmly attach the baseboard into the bottom plate.
Do you paint baseboards before or after installation?
Truthfully, you can either paint baseboards before OR after installation.
Painting them beforehand may be easier because you can put them up on a saw horse or table, versus climbing around on the floor to paint them after they’re installed.
If you paint them before you install them, you will need to do touch ups after installation.

Calculating How Much Baseboard You Need
Of course, when you go to the store to buy your baseboards, you will want to know how much to buy!
To figure this out:
- Measure the perimeter of the room in which you will be installing baseboards.
- Add one to two feet to each wall to factor in any length you may lose from cutting angles, etc.
- Subtract the measurement of any sections of your space that won’t need baseboards, like in front of fireplaces, electric baseboard heaters, door openings, etc.
- Jot the total length down (that’s the amount of linear feet of baseboard you will need).
- Take it one step further and make note of the length of the individual walls. If possible, purchase lengths of baseboard that will span an entire wall. For example, if one of your walls is fourteen feet long, consider getting a sixteen foot length of baseboard for that wall, and so on. The less scarf joints you have, the better!
How to Handle Uneven Floors
Use a three or four foot level to determine if your floors are level. If they are, great!
However, if your floors are not level, you will need to mark where to put your baseboards so they are level.
To do this, use the level and find the lowest part of the floor. Then mark where the top of the baseboard would be level in this location. Continue around the room, extending this line all the way around, using the level as a guide. Then be sure to attach your baseboards with the top of each at this line.
What About Crooked Walls?
For most houses, 45 degree angle cuts will work just fine, even if your walls aren’t perfect.
However, if you have incredibly crooked walls and weird corners, you may have to fudge those angles a little bit to make your baseboard look good when installed. How much you have to adjust will depend on how bad the walls are.
And remember, caulking will hide a lot of flaws and imperfections where the baseboards meet the wall.
How to Install Baseboards
Trim is such a lovely finishing touch in a space and installing baseboards definitely gives a room a finished look. Here’s how to do it, step-by-step.
Supplies
- your choice of baseboard
- brad/power nailer
- 2″ nails for your nailer
- spackling compound or wood filler (depending on type of baseboard)
Instructions
The method we recommend for installing baseboards is:
1. Mark the proper placement of the baseboards, by using a level to find the lowest part of the floor. Then mark on the wall where the top of the baseboard would be level in this location. Continue around the room, extending this line all the way around, using the level as a guide.
2. Cut baseboards to length, using the appropriate angles (see details below). Start with the longest wall, and work your way around the room.
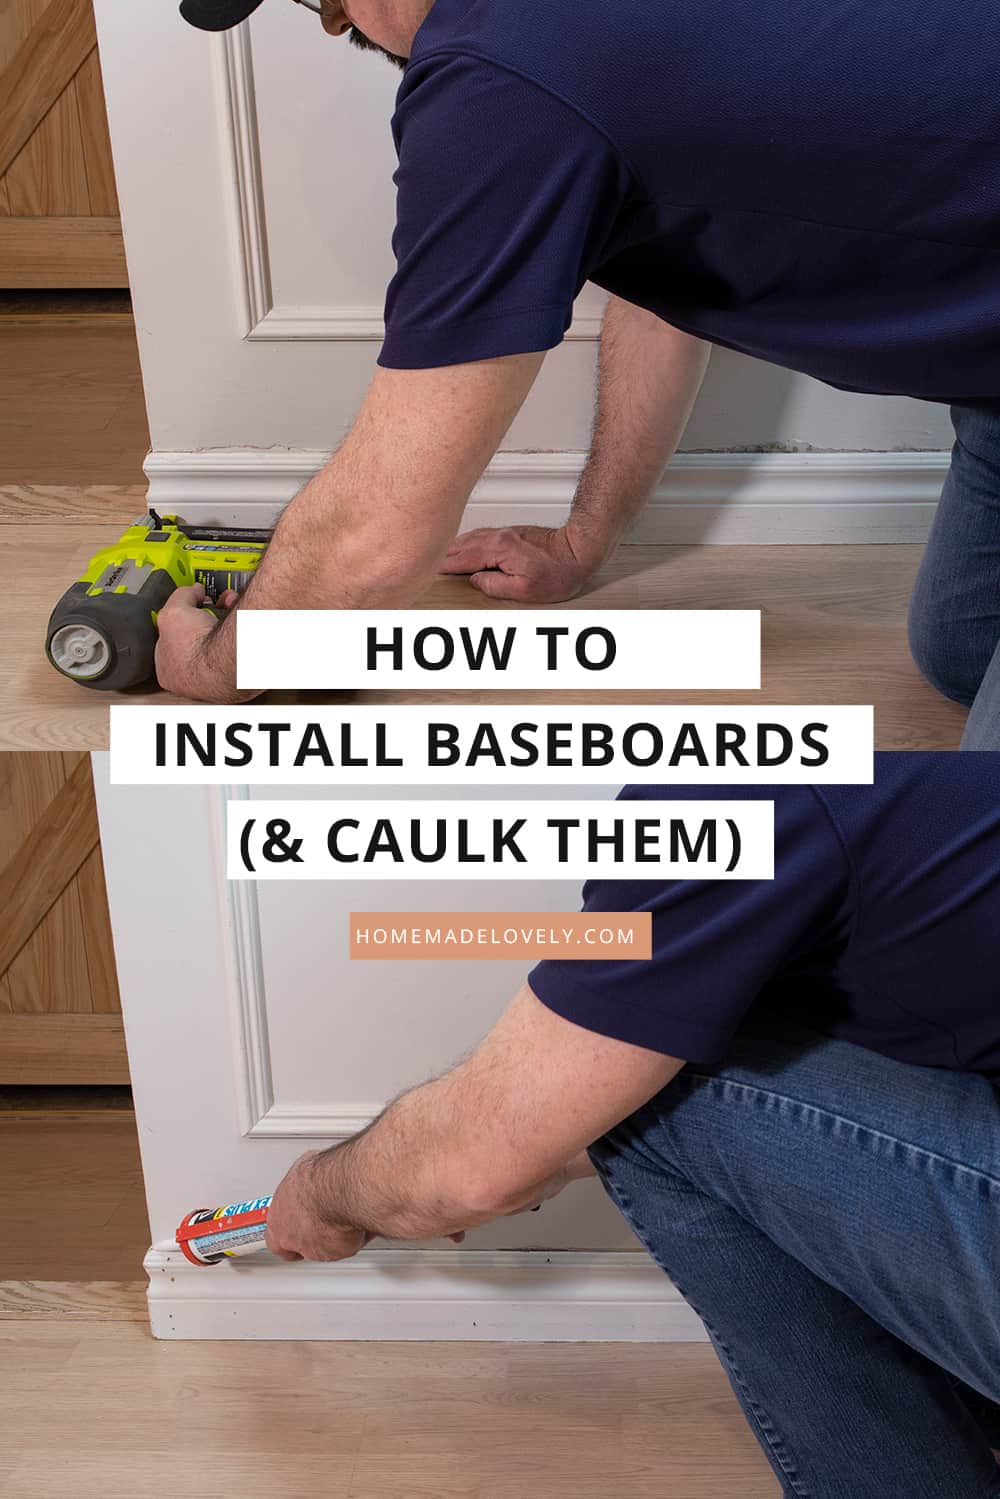
3. Hold baseboard in place and nail in place with a brad/power nailer.

4. Caulk along the top edge of the installed baseboards. (More details on how to caulk baseboards below.)

5. Fill any nail holes in the baseboards and once spackling is dry, sand smooth. We like this DAP DryDex one because it goes on pink and dries white, so there’s no guessing when it’s dry.

6. Paint trim.

7. Paint walls and caulking, cutting in to meet trim.


Types of Baseboard Joints
Here’s a quick description of the different types of baseboard joints you may need to use when installing baseboards:
Butt joint
A simple 90 degree cut. Used when the baseboard will end at a door jamb/casing.
Scarf joint
This is a joint where each piece is cut at the same 45 degree angle. Used when baseboard needs to join at the place two pieces meet in the middle of the wall (not at a corner or doorway).


Miter joint
This joint is used for outside corners and sometimes for inside corners. Generally the boards are cut at 45 degrees to meet up and form a point.
Outside Corner


Inside Corner


Coped joint
This is sometimes used on inside corners where two pieces of baseboard meet. One piece of baseboard would have a butt joint (90 degree cut) in the corner. Then the baseboard for the joining wall would be cut with a coping saw along its profile to allow the pieces to fit tightly together in the corner.

How to Cope Inside Corners
Supplies
- compound mitre saw
- coping saw
If you’re going to buy a coping saw, choose the one with the most teeth as the more teeth a saw has, the cleaner the cut will be.
Instructions
1. Cut the length of baseboard that you need, with a 45 degree angle on the end you’re going to cope.
2. Using a coping saw cut the excess baseboard off by following the profile of the baseboard. This is extremely simple to do with MDF baseboards as you can follow the white “line”.


A LOT of tutorials online say to cope ALL inside corners. But honestly, with a decent miter saw, Dean has found that he can make much tighter inside corner joints using mitered cuts than he ever could with even a good coping saw.
The only place he would choose to use a coping saw for an inside corner is when adding crown molding along a wall where it meets with existing crown molding.
How to Caulk Baseboard Step-by-Step Tutorial
One of the best finishing touches you can give a room is to caulk the baseboards. Here’s a detailed step-by-step for how to do that (plus you can use this how to caulk tutorial to caulk anything!)
Supplies
- DAP Alex Plus paintable caulking
- caulking gun
- utility knife
- paper towels
Instructions
1. Place caulking tube in caulking gun.
2. Using a utility knife, cut the tip off the caulking gun at a 45 degree angle, as shown. How well you cut this angled tip will make a huge difference in how your caulking goes on.


3. Carefully apply a bead of caulking along the top of the length of the baseboard.
4. Immediately use a clean finger to smooth the caulking along the wall/baseboard joint. Switch fingers as they start to cake up with caulking. Wipe your fingers with paper towel as necessary. Continue until the length of caulking is smooth. Then wash your hands thoroughly.

Only work on one length of baseboard at a time. You need to smooth the caulking out while it’s fresh out of the tube!
How to Paint Baseboards
Supplies
- paint
- paint brush
- painter’s tape
Instructions
1. Apply painter’s tape to the floor, tucked under the baseboard if possible.

2. Using long brush strokes paint along the length of the baseboard. Don’t worry about getting a little paint on the caulking or wall, as you will touch up and cut in from above with the wall paint.
3. When you’re finished, and while the paint is still damp, carefully peel away the painter’s tape. Don’t wait until the paint is dry, or you may inadvertently peel off paint along with the tape.


How to Install Baseboard Video Tutorial
Make sure to follow us on Youtube so you don’t miss a video!

So, there’s our crazy-detailed, step-by-step how to install baseboards and caulk them tutorial!
Hopefully, we answered all your questions. But if we didn’t, feel free to ask them in the comments below!
Have you ever installed baseboard at your house? Have you ever caulked your baseboards? How’d it go?

Thank you for this post, because so often when I remove baseboard, I am never able to put them back as beautiful as they were before I removed them. Thank to you, I think all of that will change. Nice post!
Thank you very much!
Thanks for this! Our baseboards in our stairwell have separated from the wall and definitely need to be re-caulked and re-painted. This tutorial is both timely and helpful!
Oh I’m so glad!!! 🙂 Happy repairing!
Installing plinth blocks at doorways creates a lovely finished look and eliminates the need to miter corners.