I’ve always loved the way throw pillows can completely transform a room. But when it comes to sewing them, let’s just say zippers and I aren’t exactly best friends. That’s why these easy envelope pillows are my go-to for stylish and budget-friendly updates! They’re quick to make, cost-effective, and don’t require any fancy sewing skills.

If you’re looking for more ways to bring your personal touch into your home, you might love my DIY No-Sew Floor Pillows tutorial. These oversized cushions are just as easy to make and perfect for creating a cozy, inviting vibe in any room.
How to Sew Easy Envelope Pillows
Supplies
(List includes affililate links)
- One fat quarter per pillow
- Neutral fabric (like Muslin) for back of pillow
- 16 inch pillow form*
- Thread
Tools
*You can use other sized of pillow forms, of course. But for the purposes of this tutorial, measurements are based on a 16″ pillow form.
Instructions
1. Cut the fabric: Trim your fat quarter to 17″ x 17″ and cut the neutral fabric into two pieces, each 17″ x 12.5″.
2. Hem the neutral fabric: Fold over one long edge of each neutral piece, press it with an iron, and sew down the hem.

3. Pin the layers: Place the fat quarter piece face up. Layer the neutral fabric pieces on top, right sides together, so they overlap by about 4 inches. Pin in place.


4. Sew the perimeter: Using a ½-inch seam allowance, sew around all four edges. Backstitch at the start and end to secure the stitches. For corners, leave the needle in the fabric, lift the presser foot, and pivot.

5. Trim and turn: Snip off the corners to reduce bulk, turn the pillow cover right side out, and press with an iron.

6. Insert pillow form: Pop in your pillow form and enjoy!

These steps can be adjusted for pillows of any size—just remember to add a ½-inch seam allowance and allow for sufficient overlap in the back.
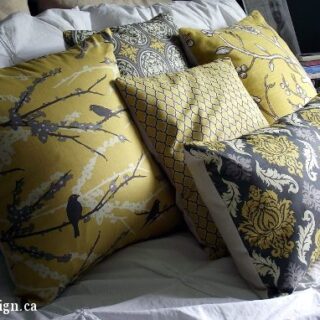
The Fabrics I Used

Top to bottom:
- Joel Dewberry Aviary 2 Sparrows in Vintage Yellow
- Joel Dewberry Aviary 2 Scrollwork in Granite Grey Yellow
- Joel Dewberry Aviary 2 Lattice Vintage Yellow
- Joel Dewberry Damask in Granite
- Dwell Studio Blossom Print in Citrine (Not shown above. Far right pillow below.)
How to Sew Around a Corner
1. Sew along one side until 1/2 from corner edge.

2. With the needle still in the fabric, lift the presser foot.

3. Rotate fabric 90 degrees.

4. Replace presser foot and continue sewing.

Repeat all four steps as needed.
FAQs
The overlap creates the envelope closure, keeping the pillow form secure without needing zippers or buttons.
For a snug, professional look, use a pillow form that’s the same size as your cover. For this tutorial, I used a 16-inch form, but you can adjust the measurements for other sizes.
Absolutely! If you’d like a reversible look, use coordinating fabrics for the front and back.
Yes, though it will take longer. Use a sturdy backstitch for durability.
Easy Envelope Pillows Tutorial
Materials
- One fat quarter per pillow
- Neutral fabric (like Muslin) for back of pillow
- 16 inch pillow form*
- Thread
Tools
- Sewing machine
- Scissors
- Straight pins
Instructions
- Cut the fabric: Trim your fat quarter to 17" x 17" and cut the neutral fabric into two pieces, each 17" x 12.5".
- Hem the neutral fabric: Fold over one long edge of each neutral piece, press it with an iron, and sew down the hem.
- Pin the layers: Place the fat quarter piece face up. Layer the neutral fabric pieces on top, right sides together, so they overlap by about 4 inches. Pin in place.
- Sew the perimeter: Using a ½-inch seam allowance, sew around all four edges. Backstitch at the start and end to secure the stitches. For corners, leave the needle in the fabric, lift the presser foot, and pivot.
- Trim and turn: Snip off the corners to reduce bulk, turn the pillow cover right side out, and press with an iron.
- Insert pillow form: Pop in your pillow form and enjoy!
What do you think? Will you give these easy envelope pillows a try? I’d love to hear about your creations in the comments below!

You are so very talented. My oldest daughter got a sewing machine for Christmas and nana is teaching her how to use it. I’m learning by observation!
I can sew a straight line – and that’s about it! 🙂
Hello Shannon…I was just wondering if it would be okay you that I start to follow all the fun and inspirational things you share on you’re site….I can sew a straight line too and so……..I’m gonna be makin’ meself a new pillow cover from your instructions…………………..Happy Day to you from me, Jayne
LOVE THE FABRIC!
Great combo found on etsy!
Beautiful colours! I love the pillows and the instructions are great.
I’m so glad…it took me hours to write the tutorial with a head cold!!!
I just started sewing this past Christmas and I’ve made a couple pillows. Thank you for your easy tutorial, but I’m not sure what you mean by a fat quarter piece of material?
Hi Brook,
“A fat quarter is a one-fourth yard cut of fabric that (usually) measures 18″ x 22″ instead of the typical 9″ x 44″ quarter-yard cut. The longest side’s dimension will vary if your fabric is not 44″ wide.”
(Definition from here: http://quilting.about.com/od/stepbystepquilting/ss/fat_quarters.htm)
Basically it’s like taking a yard of fabric and cutting it in four squares instead of four long pieces.
Hope that helps!
xo,
S.
Beautiful pillows Shannon – they look so pretty in your bedroom! I love this DIY pillow style – I’ve made a few envelope style pillows too and they really are so easy to make!!
Thanks, Heather! They are easier than zippered pillow covers, that’s for sure!
Love the colors! I really need to break out my sewing machine and make a few new covers (add that to the list!).
What list? The never ending to do list?! I don’t know anything about that! Ha!!!
Great colour combination! Thanks for sharing the instructions – you make it look pretty easy!
If I can see it, it must be easy! A seamstress, I am not!
Great! Thank you so much. I’m getting ready to make Pillows for a Reception Lounge Area. I was dreading the zipper, this will be much easier and faster.
Awesome – shouldn’t take any time at all!
Fabulous pillows Shannon, I might have to give this a try, you make it look so easy…we will see 🙂
Let me know how it goes!
Your pillows turned out beautiful – love the pattern on them! Thanks for posting your tutorial too, I’m Pinning this for sure!!
Thanks, Heather!
Pretty fabrics!! That bedscape is looking great.
It’s so cozy too! Thanks, Tia. 🙂
Making pillows is on my summer “to do” list. I love the fabrics that you used for yours.
Here’s hoping your to-do list isn’t never-ending!
Yep, I get you…obsessive about my throw pillows!
🙂
shaunna
😉 I get ya! xo
Your pillows are super cute. They look great on your bed.
Thank you! Dean doesn’t even mind the pile of pillows too much!
These are soooo cute! I love the fabric and the tutorial. Thanks for sharing at Silver Pennies Sundays! x
Thank you sweet girl! xo
I loved this tutorial, I am no good with a sewing machine (or even a needle and thread) but it was great you even showed how to sew around a corner!
I figured if I could pretty much only sew a straight line, it couldn’t hurt to show a corner! So glad it was helpful!
I don’t know what a fat quarter is, & I don’t understand the “envelope” part. Are they actually sewn shut, or is it more of a “fold lock top”, which was my first thought when I read “envelope”. Thus enabling one to forego the zipper, & yet remove the cover for cleaning…
Another reader asked a few comments up: “A fat quarter is a one-fourth yard cut of fabric that (usually) measures 18″ x 22″ instead of the typical 9″ x 44″ quarter-yard cut. The longest side’s dimension will vary if your fabric is not 44″ wide.” It’s just a cheaper way to buy fabric for pillows if you want several different patterns. And no the envelope is not stitched closed, it is just as pictured with overlapping fabric at the back so the cover can still be removed for cleaning! 🙂
Love the fabric! I have plans to make envelope pillows soon…just need to get motivated and dig out the sewing machine!
Dig it out!!! You e mentioned making pillows before….
I’m always impressed when I see what other people can do with their sewing machines! I love these pillows and the fabric is so pretty. I can’t even sew on a button. LOL!
I can sew a straight line…and that’s about all!
It’s been years since I made an envelope pillow, but I’ve been thinking about doing it again recently. I love the fabrics you chose and the use of fat quarters is brilliant!
Thanks for sharing with us!
Any way to make a simple project even easier, right!!
Love the material and the tutorial!
A few of my favorite Joel Dewberry fabrics, for sure! Thank you for saying so.
Thanks for this tutorial…you make it look easy. This is definitely on my list of to do’s…I have to pin this so I can use it for my own pillows!! I love the fabrics you chose, they are just beautiful. I would love if you stopped by my blog and shared these at my first blog party…Weekend Beautiful 🙂
Shawna
Believe me, it is totally easy! Good luck with your new party!
Great tutorial!!! You rock!
Aw! Thanks!
Awesome tutorial! Pinning now! ~Lisa
Thank you!
Thank you for making this easy for people like me that get overwhelmed with how to start a project. Your instructions and pictures are wonderful! I’ve made a few of these wonderful pillows and it seems so easy now. You are a very kind person to share this with everyone. I am going to teach my young nieces how to make these over the summer, I know they will love it!
Take Care Shannon, you are a lifesaver, I know what to make for Christmas presents next year
Penny
Thanks for all your wonderful ideas…can’t wait to get started on some easy envelope cushions…
Have fun!
Hello Shannon,
My Daughter and I have bought so many fat quarters between us and have been trying to decide what to make with them.
To have somewhere to go that gives easy to follow instructions with beautiful results is just what we need.
So looking forward to getting to know your web site.
Kindest Regards,
Lorraine
Have so much fun! 😉 And we’re super glad you’re here.
Such a great tutorial. I think I can actually do this, thanks to you.